5 Easy Hacks to Make Your Napkin Images POP!
Are you looking for ways to elevate your napkin images? Maybe you have beautiful napkin image on white. It looks pretty but could use more contrast or colors. Let’s talk about ways you can make these napkin images look even more amazing!
When I started creating this project, things were going so well, but then they unexpectedly went sideways! I’ve been working with napkins for years, but there’s always something new to learn. So we’re not only going to talk about techniques, but what to do when you make a mistake or feel like your mixed media project is careening out of control!
Hop-A-Long Studio is reader-supported. When you buy through links on our site, we may earn an affiliate commission at no cost to you. Learn more.
Adding the Napkin
Before we can start adding to our napkin image, we need to add it to the white page. After fussy cutting the napkin and removing the extra layers of napkin, I’m using my favorite collage medium to add them to the page. If you’ve never seen this technique before, please refer to the video below, or click here to see the article. This will help you get the best results with this technique.
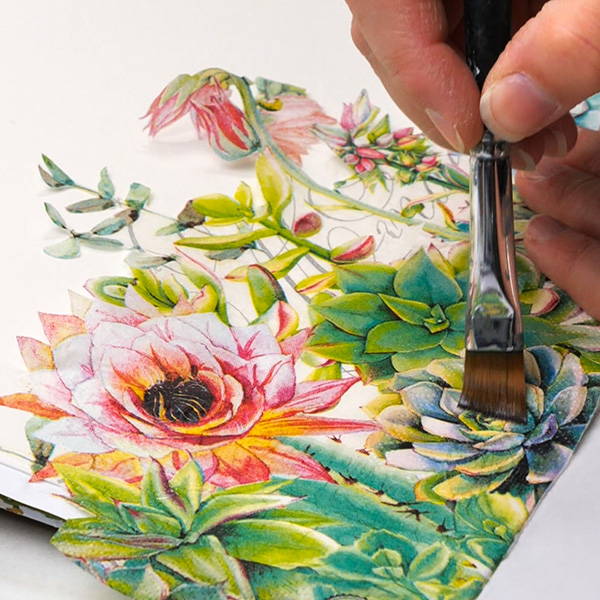
For this project I’m going to take advantage of the porous nature of the watercolor paper. When adding your Liquitex Matte Medium or your favorite collage medium to the page, only add it to the napkin area, don’t add it to the entire page. For the small fussy cut areas of the image, I added it only on top of the napkin.
The Problem with Napkin Images
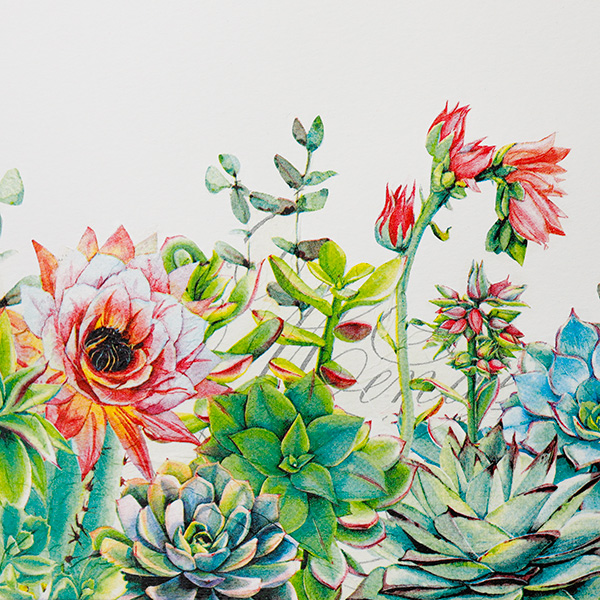
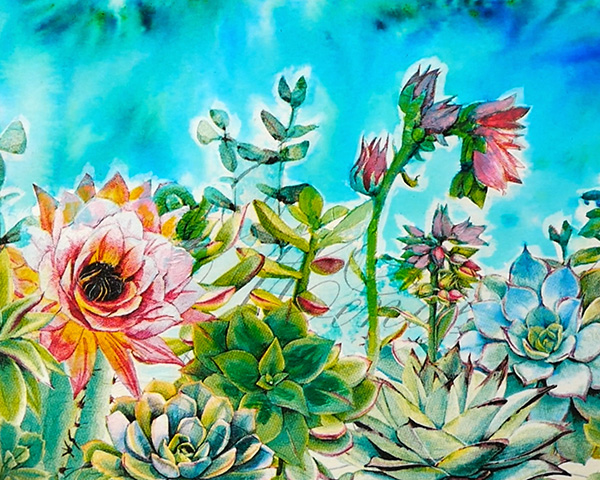
So the napkin image looks great on the white paper. It’s beautiful, contrasting, and colorful. But it can be a little blah. If I left the page as it is, I’d feel like it was missing out on some elements that will make it amazing!
One of the problems with using napkin images for art is because they are so transparent, when you add them on top of a colored background they disappear. This is why I’ll be showing you how to add color to the napkin after it’s been added to the white paper.
So let’s start leveling up our napkin art journal page!
Altering the Background
Before we look to add color to the background, make sure that you’ve done a good job sealing in your image with matte medium. If you’re not sure, add another layer to the image. These techniques will work the best if your napkin in fully sealed to the surface.
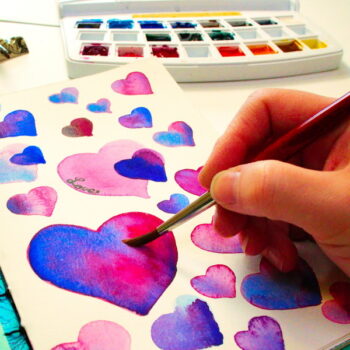
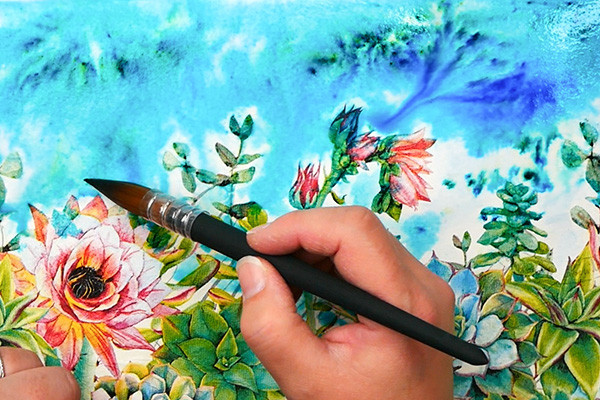
Adding a Watercolor Wash

Because we haven’t added matte medium to the white background, this opens more creative possibilities. We can use the absorbent nature of the watercolor paper to our advantage. Brush a layer of clear water onto the background. Then use your favorite watercolor paints to add color to the surface. To create a gradient, apply the color to the top of the project and blend it down into the water. The areas with the napkin will resist the watercolor paint, but I like to paint around the floral areas to keep the napkin image as bright and clear as possible.
At this point you can leave it as is or add in more watercolor paint until you get the depth of color that you like.
Leveling up the Watercolor Wash
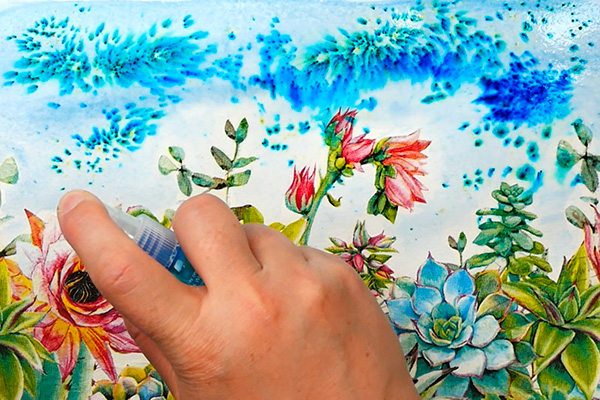
You can stick with a basic watercolor wash, but I wanted to level the background up a bit by adding in Brusho Crystal Colours. These pigment powders are meant to blend with water, which makes them a perfect addition to this page. After shaking Turquoise and Sea Green crystal colors onto the surface, use your brush to move them around on the surface.
I love the Brushos, but they can create vivid patterns that are a bit distracting to the other elements. As I didn’t want the brushos detracting from my main focal image, I blended them out to create a textured, but softer look.
I love this background, but as it dried, I realized that I made a mistake!
My Mistake
You can see that some of the blue watercolor has seeped into the images.
I’ve been creating with napkin images for years, but this is the first time that I’ve fussy cut an image and applied it while trying to keep the rest of the background free of matte medium. I only added matte medium on top of the small floral fussy cut areas, instead of adding it both underneath and on top thinking it would be enough. I was wrong!
So you may think that the image is ruined…not yet! Let’s talk about how we can fix these mistakes and still use this beautiful image.
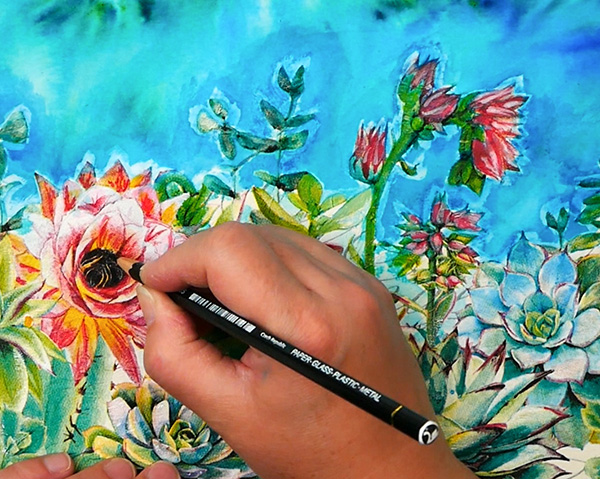
Adding Acrylic Paint to Napkin Images
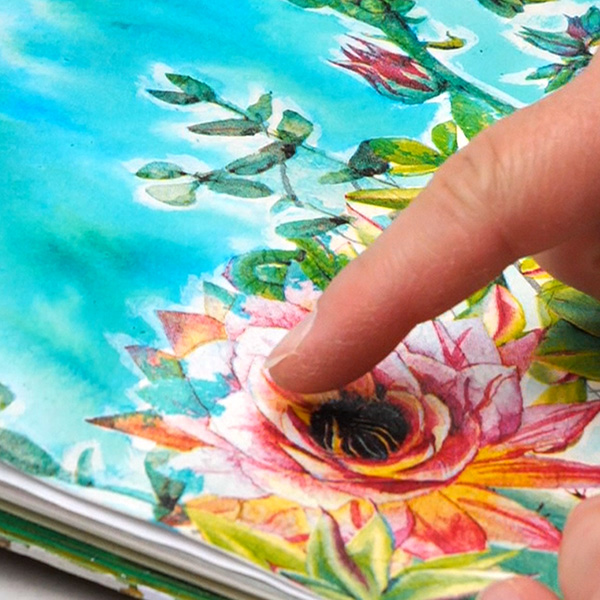
The easiest way to fix images is to use thinned acrylic paint. If you’re using a heavy body paint like Amsterdam acrylics, add a bit of water to your paint on a palette to thin it out. Go over the areas of the image that are stained to get them back to the original color. When you do this, avoid the edges so that you don’t lose the details.
You may need to add more than one coat of paint to get the images looking the way you want it to. I like to build thin layers when I’m using this to fix a napkin image.
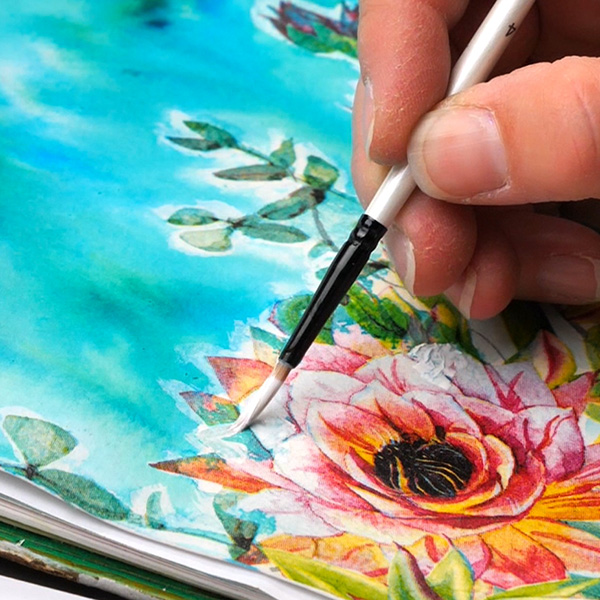
Using Paint for Highlights and Shadows
I also love to use this technique to add shadows and highlights to the image. The key is to not add the paint everywhere, but to use it to accentuate an area. This is an easy way to add in darker shadows and highlights or just to brighten the colors of a napkin.
Halo Image Around Your Napkin
When I was applying the matte medium to my image, I was trying not to apply it past the edge of the napkin, but this was extremely difficult. After adding the watercolor wash to the background, you can see where the matte medium resisted the watercolor wash. This created a halo of white around the edge of the napkin. You have two choices: you can leave it the way it is or try to add another medium on top to hide the halo.
In hindsight, I should have just left my image! But instead, I played around with watercolor crayons to see what look I could achieve.
Watercolor Crayons
You can use watercolor crayons to color on top of the matte medium. The watercolor crayon will look coarse when first applied, so use a watercolor brush and water to blend out the color. This does help to remove some of the halo edge, but the challenge was how to blend it nicely into the watercolor background.
You may need to back and forth with the watercolor crayon and the amount of water on your brush to get a nice blend. It worked ok, but in hindsight, I should have just left the image with a halo.
Lesson Learned

If you are going to add detailed napkin images like this to an art journal page, add matte medium in an even halo around the image. This way at least it will look purposeful and will make the design pop off the page more.
If you want to get rid of the halo, my suggestion would be to use acrylic paint and create a different color halo to blend into the watercolor background. By trying to be too clever and subtle about this, the page went in a direction I didn’t really want it to go.
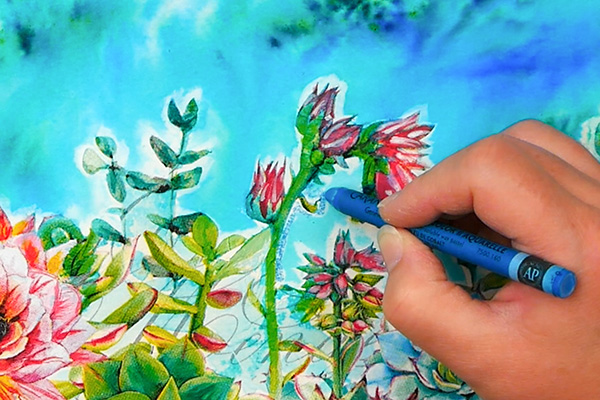
Using a Stabilo All Pencil
What if you find that you still want more contrast for your napkin image? Try using the Stabilo All pencil! This amazing pencil will write on paper, plastic, glass and metal. This means that it will work beautifully on a mixed media surface!
You can use it as a pencil to add dark and shadow areas around your project. But the magic of this pencil is that you can also mix it with water, which lets you blend the color out with a brush. Since we are using the Stabilo All pencil on a napkin that is sealed with matte medium, if you add too much color, it can easily be removed with a paper towel or brush.
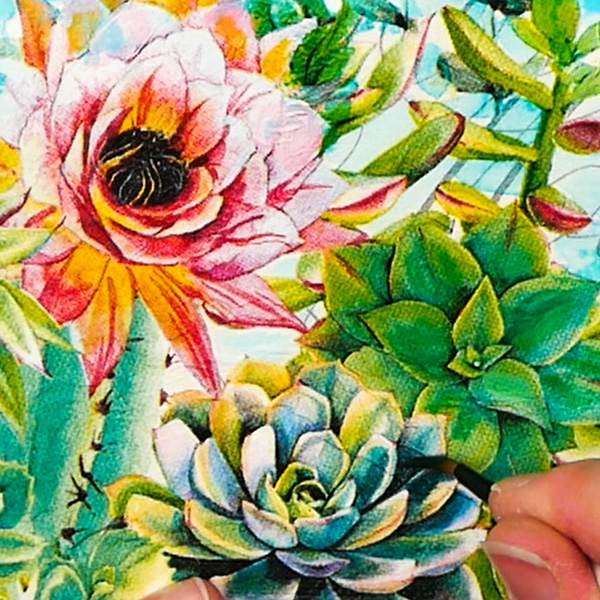
Add a Bit of Shine!
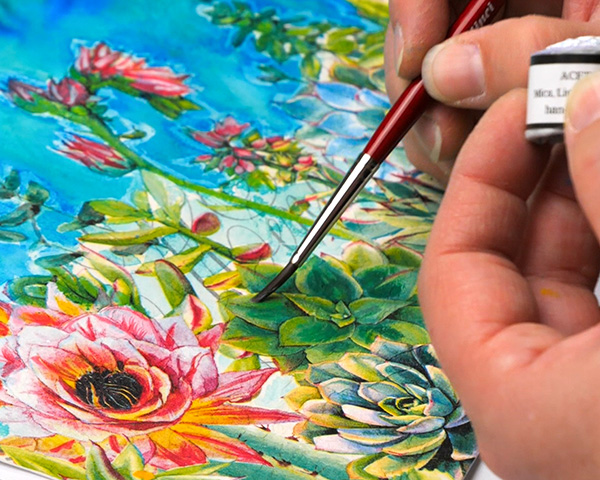
If you’re like me, a little bit of shine and mica is always a welcome addition to any project! I love using my Beam and Stoneground mica watercolor paints to create shine on my projects.
The silver and gold colors are fantastic to create highlights on the succulents. For the leaves, I love to use the green mica watercolor paint. It’s a fun way to add in little details that catch the light.
Adding in Texture
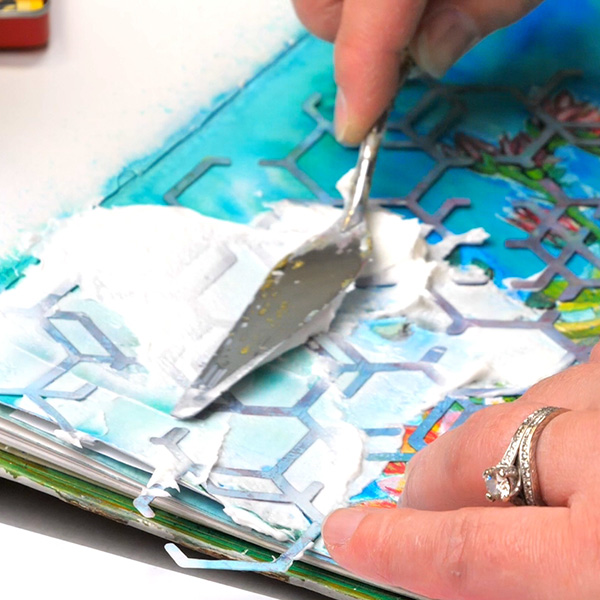
Since I wasn’t super happy with the halo effect, I decided to take this project a step further and play with the background texture.
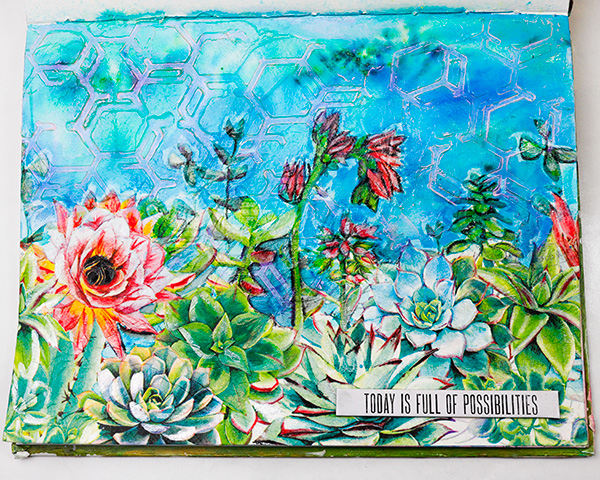
I love using gel mediums to add clear texture on any project. You can use a regular, heavy and super heavy gel through a stencil to create beautiful texture. For this project, I was using Liquitex Super Heavy Gel and a stencil with large open spaces. Using a palette knife, I added the gel through the stencil, covering the background and some of the background succulents. I made a point to leave the larger images untouched by the gel.
It’s a subtle look, but it’s a fun way to add texture to a page.
Drying the Gel Medium
I ended up accidentally having areas that were a bit thicker than I originally planned. When working with open stencils it can be a bit hard to control the gel with the palette knife. It usually dries in an hour or two but in this case, I had to leave it overnight.
You will know that the gel is completely dry when it is fully clear. If it’s cloudy, it may be dry on the surface but not underneath.
Adding in Waxes
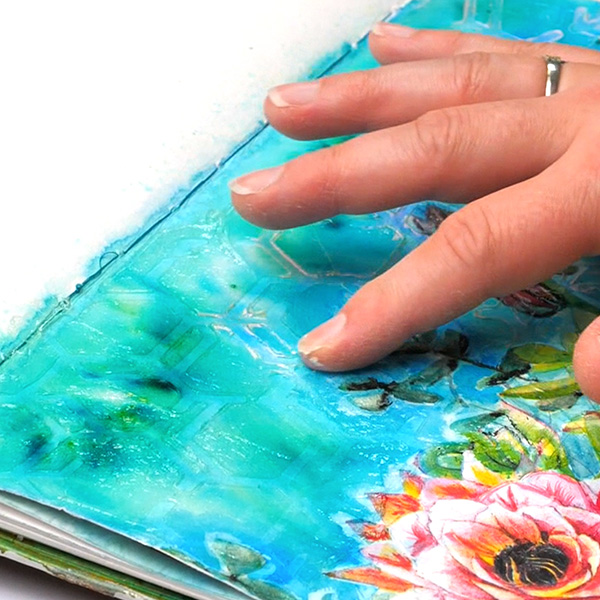
Even though the gel created beautiful texture on the page, I felt like it didn’t stand out as much as I had hoped. This is where waxes can help accentuate the texture on any page. I tend to use Art Alchemy waxes because they are easily available and come in a large range of colors. For today I was using a Sizzix Lilac Shimmer wax that is no longer available. You can also use any other color of wax to get this same technique.
Add a bit of the wax to your finger and rub it around the gel texture areas. Any raised or uneven areas will pick up the wax. For this project, the wax is not sticking to the top of the gel areas but is catching the sides of the stenciled image and the water background. This helps you see the texture but doesn’t take away from the focal images.
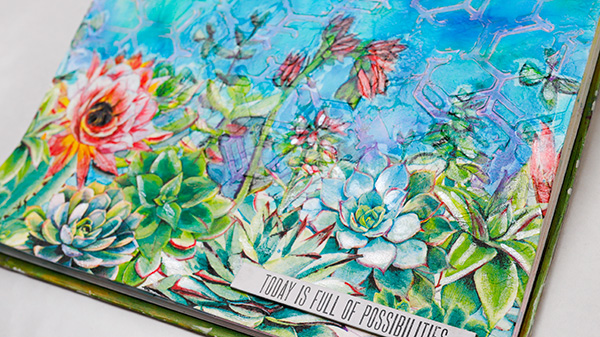
Finishing Up the Page

I always like to finish up my art journal projects with a thought. Today I’m using a quote chip from Tim Holtz, “Today is full of possibilities.” I thought that this was a perfect way to finish off this page. It’s great to think about the possibility in every day and be grateful for what we have.
Any Questions?
Any questions on these techniques? I’ve used a bunch of different ideas for how you can elevate your napkin images in this project. If you’re new to napkins or need a refresher with basic techniques, check out this article next: New to Napkin Decoupage? Start Here!
Have a great creative week and I’ll see you back here soon!
Project Supply List
- Succulent Napkins https://amzn.to/3XguIZq
- Liquitex Matte Medium https://amzn.to/3SXXpry
- Brusho Crystal Colors Turquoise https://shrsl.com/4nfxf
- Brusho Crystal Colors Sea Green https://shrsl.com/4nfxe
- Acrylic Angle Brushes https://amzn.to/3WXcCKX
- Amsterdam Acrylic Paint https://amzn.to/4dWtrfB
- Stabilo All Pencil https://amzn.to/4czI87n
- Sizzix Luster Wax https://shrsl.com/4nfxc
- Liquitex Heavy Gel Medium https://amzn.to/3AAV2ou
- Stencils https://shrsl.com/4nfx9
- Tim Holtz Quote Chips https://amzn.to/3MlOCvO