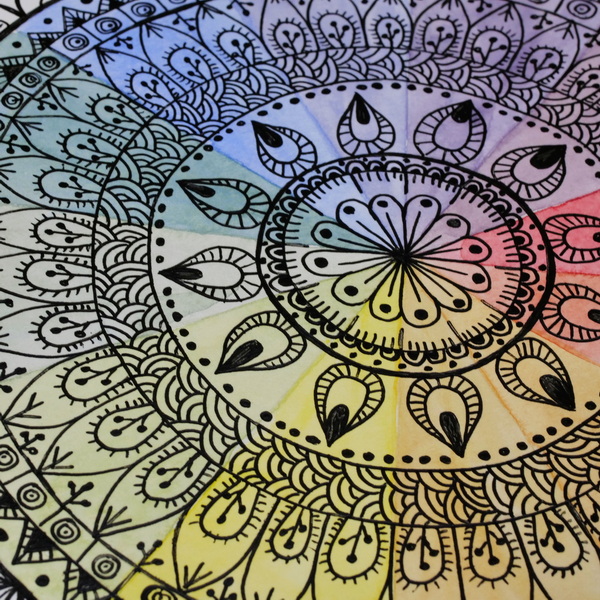
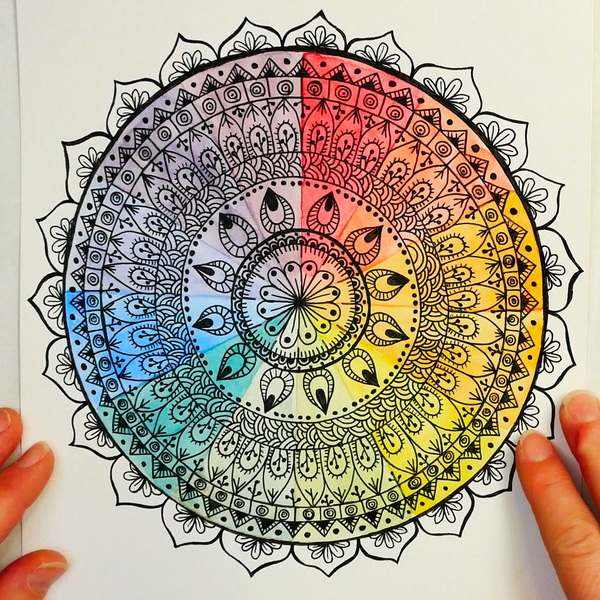
How to Create a Colorful Mandala Using the Color Wheel
New to mandalas and color theory? Learn how to create a colorful mandala by combining these two techniques. If you were following along last week, we were talking about how to use the color wheel to create unique color combinations in the art journal. Today we will paint a color wheel and then turn it into a beautiful, colorful mandala.
Hop-A-Long Studio is reader-supported. When you buy through links on our site, we may earn an affiliate commission at no cost to you. Learn more.
How to Create a Color Wheel
The mandala and color wheel have a similar structure. By creating the shape of a color wheel, this takes you 90% of the way there for creating the structure for a mandala.
Create a Large Circle
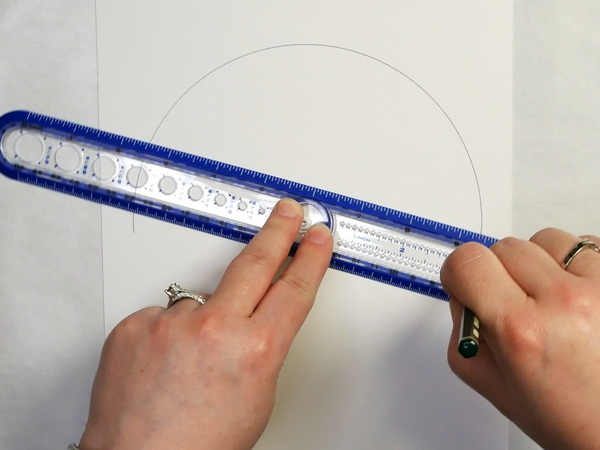
Measure the size of your page and add a dot to the center of your page. You don’t necessarily have to center your color wheel. But I’ll be adding this project into my art journal, so I want my image to be centered.
The page that I’m using for this project is 8.5 by 11 inches. If you are using paper of similar size, draw a 7” circle on the page using a circle making tool. My favorite tool is the Helix Circle Ruler as it is one of the easiest tools for quickly making circles.

This 2-in-1 ruler and compass lets you draw circles from 1" to 12". Place the center disk hole on your starting point and choose your desired circle size (in 1/8" increments). Insert the pen into the hole and then hold down the center disk. Sweep around with the pen in the hole until the circle is complete.
Line the center of the circle ruler up to the dot on the center of the page. Choose the small circle that is at the 3.5 inch mark on the ruler and draw a circle.
If you’ve never seen a circle ruler or the Helix Circle and Angle Maker before, check out this article where I shared my favorite circle making tools.
Now we need to add in the additional circles for the mandala. Choose random circle sizes to add at least 6 circles within the large circle. For this example, I have some circles that are ¼” apart and others that are ¾” apart. The size of the circles depends on the personal aesthetic you like for your mandala.
Divide the Circle
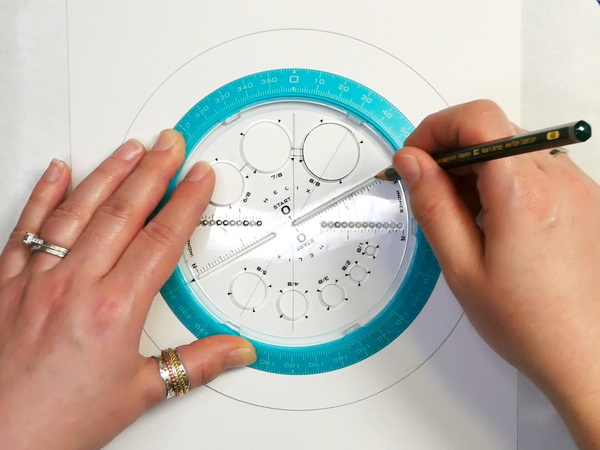
Divide the circle into 12 equidistant sections. The easiest way to do this is using a Helix Circle and Angle Maker. This tool makes measuring angles incredibly fast and easy! Line up the center of the Angle Maker to the center dot, positioning the outside-colored ring with degree marks to be at the top of the page reading 0 degrees.
Take 360 degrees and divide by the number of sections that you want, in our case, 12 sections. 360 degrees divided by 12 is 30 degrees. Using a pencil, add a line at zero degrees, then another at 30 degrees, and continue to add all the angles that you need for your color wheel.
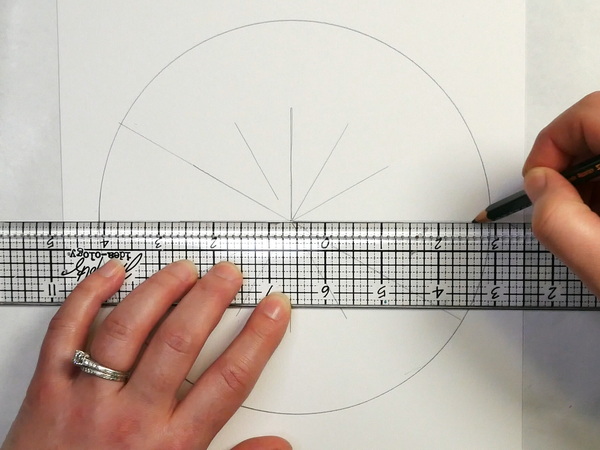
The angles are indicated, but they are not the full length of the circle. Use a straight edge ruler to add the lines into the circle for the full length. This is the easiest way to quickly add angles to any mandala or color wheel.
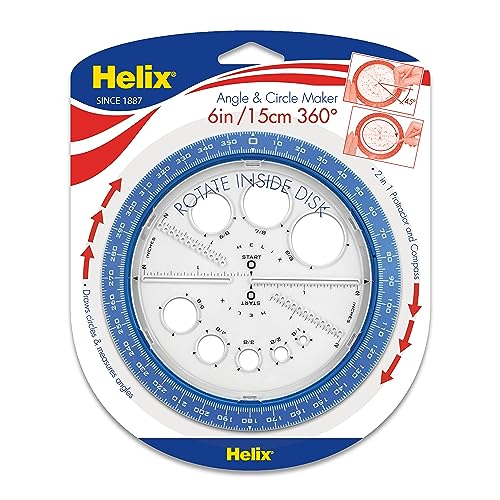
Three tools in one! The Helix Angle and Circle Maker is a 360° protractor, compass, and circle template that enables you to measure angles just as you would using a standard protractor.
Adding Watercolor to the Color Wheel
When coloring the color wheel, use your favorite medium. This couple be colored pencils or markers, acrylic paint, or watercolor paint. Today I’m using watercolor paint so that I can see all the light pencil lines after I’ve added the color.
If you choose to use a darker and more opaque medium, like acrylic paint, this will hide the lines. You may need to redraw in some of the lines later.

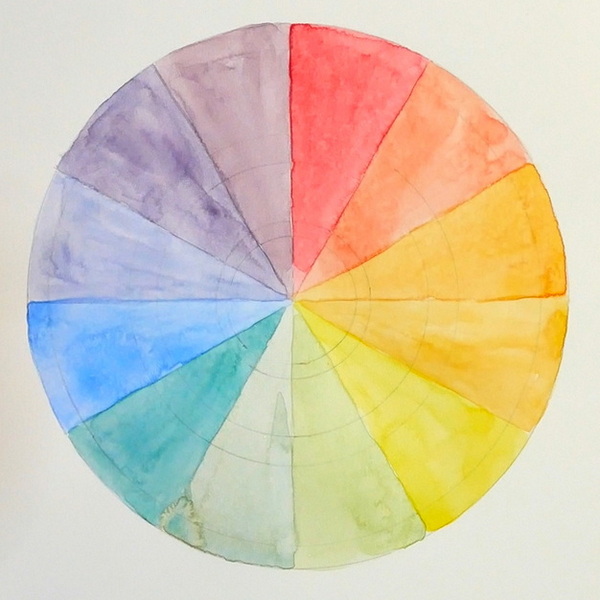
Add in Primary Colors
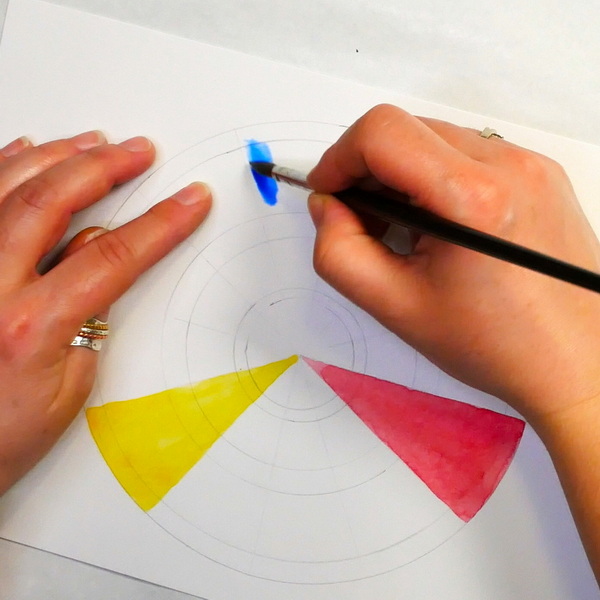
Add in your primary colors of blue, red, and yellow first. If you don’t understand the difference between primary, secondary, and tertiary colors, check out this article that I posted last week. It goes into basic color theory and color relationships.
Create a large puddle of watercolor for each of these primary colors. These colors will be used for mixing the secondary and tertiary colors as well as applying the primary colors. I like to mix up a lot of color on my palette before I start applying the paint.
Paint the primary colors equidistant apart on the color wheel. There should be 3 empty pie spaces between each of the primary colors.
Mix and Paint in Secondary Colors
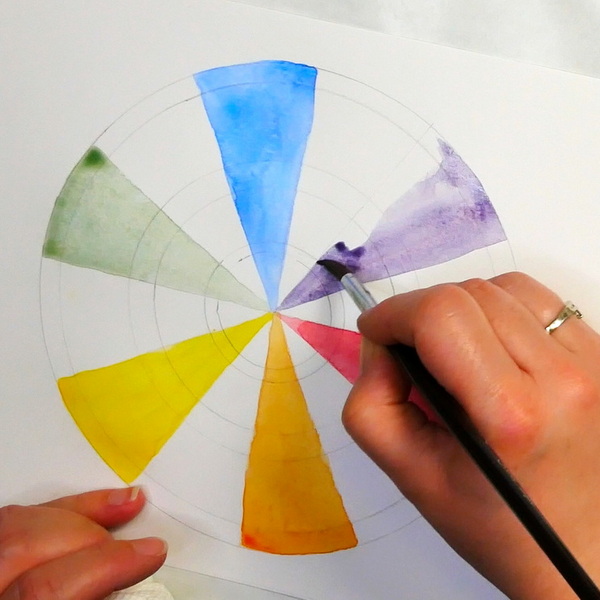
To create a secondary color, mix equal amounts of 2 primary colors together. Add the secondary colors to the color wheel equidistant between the two primary colors.
Mix and Paint in Tertiary Colors
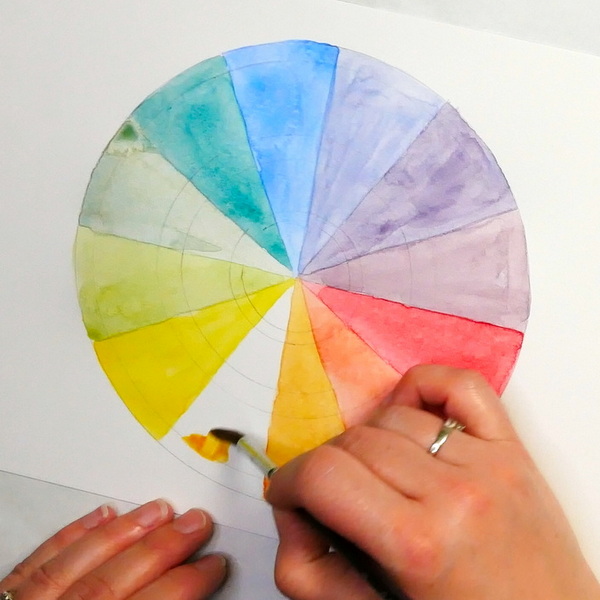
The tertiary colors are created by mixing a primary and secondary color together. Mix these colors together and add to the color wheel. It may take a few tries to get the right blend of both colors to get the correct tertiary color.
When adding the watercolor paint to the color wheel, make sure that the color next to it is fully dry. Watercolor will always run towards a damp area, creating a bleed. To prevent bleeding, touch the paper. If it is damp or cool, it’s not dry. Once it reaches room temperature, you can add another layer of paint.
- 24 ergonomically slanted wells with two (2) generous mixing areas
- Removable mixing tray for easy cleaning
- Colors appear the same on both the palette and watercolor paper
- Leakproof and airtight palette for watercolor or oil paint keeps colors fresh for weeks

- Quality student-grade range
- 40+ colors, including modern and historic pigments
- Strong tint strength
- Reliable transparency and lightfastness
- Uniform consistency for beginners and students
Color Variation
You’ll see that the color wheel I’ve painted has lighter colors, not the deep intense colors that you can create with watercolors. I purposely left these colors light so that the black pen of the mandala will stand out. If you want a deep and intense colors on your color wheel, choose a pen color (white, gold or copper) that will work with darker colors.
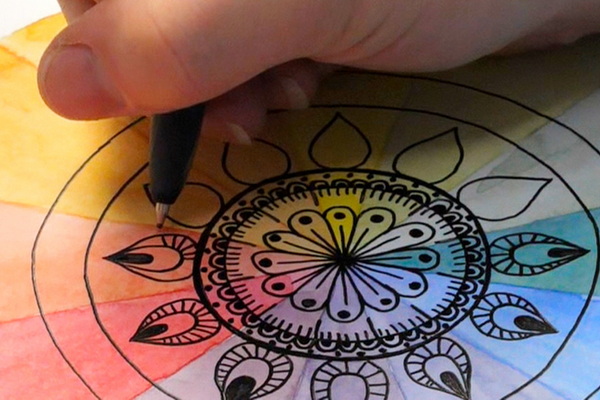
Creating a Mandala
Once the color wheel is completely dry, start adding in designs to make a colorful mandala.
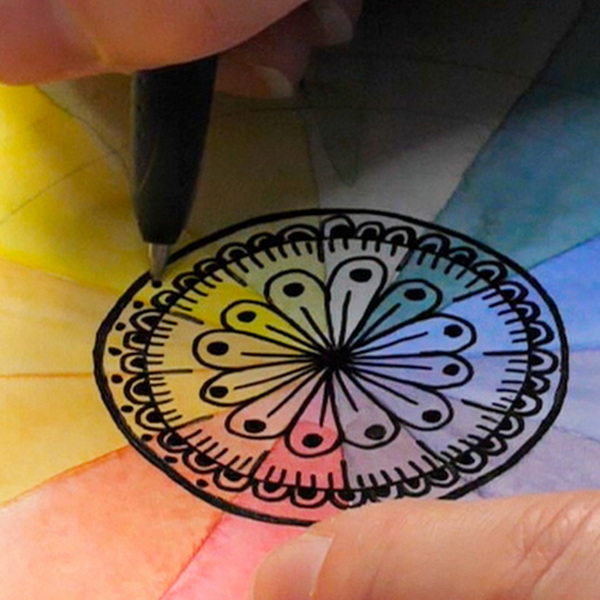
Choosing a Pen
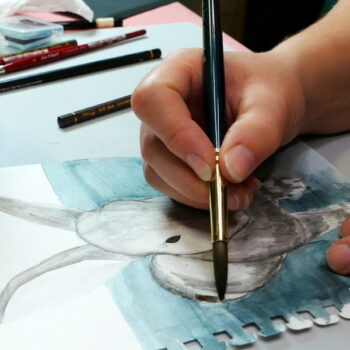
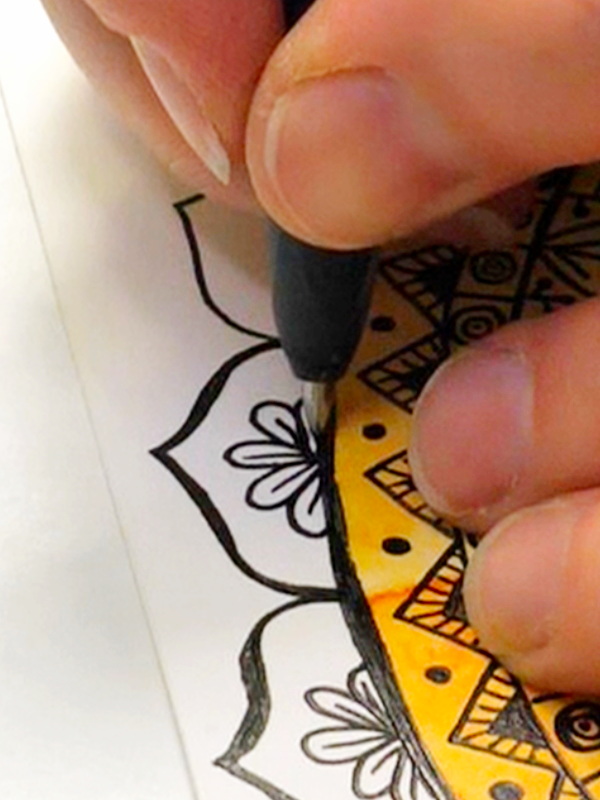
You can use any pen that you’d like for mandalas. For this project I’m using a Pilot ballpoint black pen. Any roller ball pen, Micron Pen or Pitt Pen will also work for this project. If you’re not sure what to use, check out this article where I share my favorite black permanent pens.

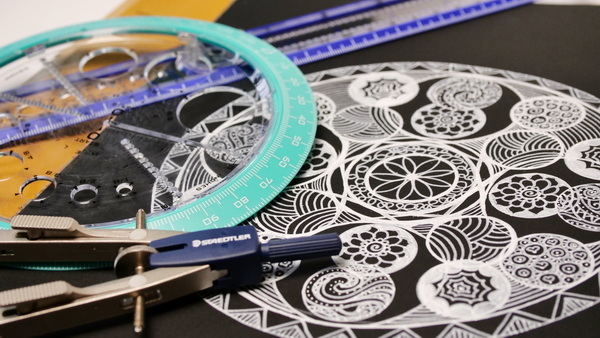
Choosing a Design
There are so many doodles and different designs that you can use when creating your mandala. If you’re looking for inspiration, just search for “mandala designs” or “doodle designs”. There are so many patterns out there! Today I’m using a variety of patterns that are inspired by books I’ve read, classes I’ve taken, and by searching the internet.
When choosing shapes, in the bigger circles I’ll use large shapes with a lot of details. In smaller areas, I will simplify the shapes to ones that will be clearly seen in the small spaces.
This is meant to be a beginner mandala project. This means I’ll be keeping our designs strictly within the circles that we’ve created in the previous steps.
Mandala Circle 1: Add a Flower
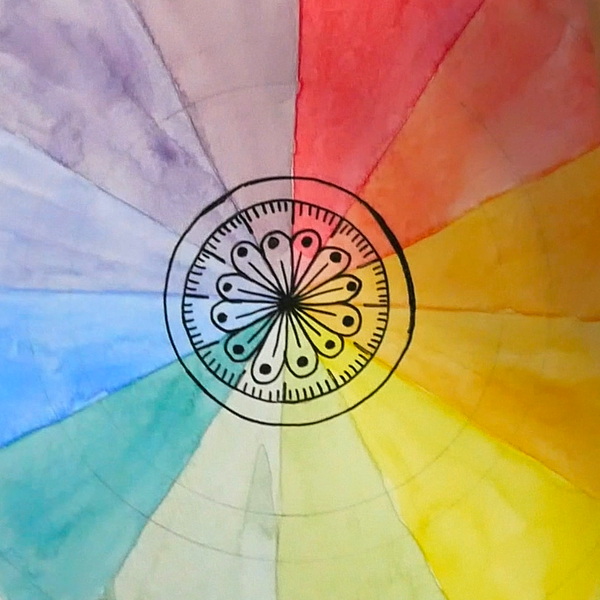
I like to start at the center of the design and add a dot with my pen. Draw a petal in each of the 12 pie areas. The lines from the color wheel will help keep your petals consistent in shape and size. Add a line to the center of each petal and a dot at the top part of each petal.
If you still have room, like I did, you can add in long and short lines to fill the space.
Mandala Circle 2
In the second mandala circle, create half circles and filled them in with smaller half circles. In the open areas, above add in small dots.
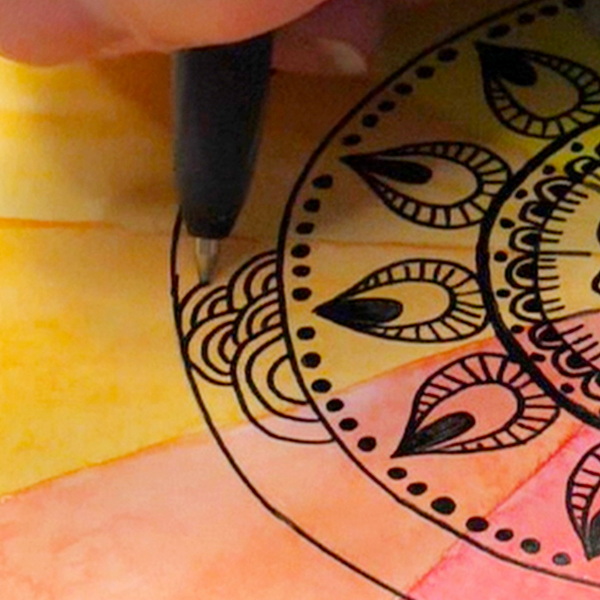
Mandala Circle 3
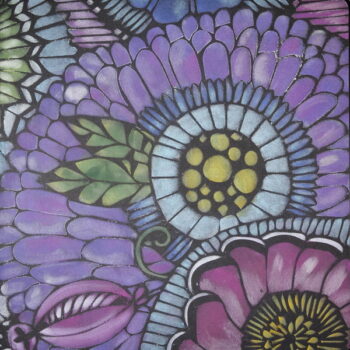
Create petal or leaf shapes facing to the outward edge of the circle. I like having all my images point out, I feel that it gives a consistent and dynamic look to my images. Add in another petal shape within the larger image, and then another even smaller petal shape. Fill in the smallest petal shape with ink. Add in texture between the two other petal shapes. I like to use slanted lines as it follows the shape and makes it more dynamic.
Sometimes it can feel like there’s too much open space in the design. This is what I love small circles and dots! This can add little details without taking away from the main image.
Mandala Circle 4
Create a set of 3 semi-circles or rainbows on your page. Add in another set at a different angle. Continue to do this until you have fully covered the circle with these images. This is a simple pattern that creates beautiful complexity to the mandala but is extremely easy to make!

Mandala Circle 5
This is the largest of my circles in the mandala. This means that I can create several images in the circle without the design looking crowded. Add in another petal or leaf shape. This one will be a bit skinnier and pointed at the end. Add in an oval in the center of each petal. Within that oval, add in the little flower graphic. Add dashes on the outside of the oval to create interesting texture.
I didn’t want to leave too many blank spaces, so I also added in a 3 dashes shape at the top of the petal and another flower graphic hanging down from the “ceiling” of the circle. As you can see, you can add a lot of small images into a larger mandala circle.
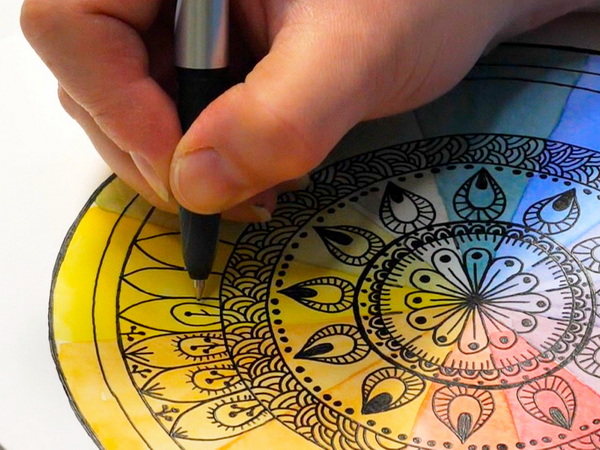
Mandala Circle 6
For this circle, as it is smaller and narrower, stick with a simple design. Add a circle, then add another circle within that circle, and then add a dot in the middle. Between each of the circles, add a straight line to create a border between each of the circles.
Mandala Circle 7

For this last circle, I wanted a darker and more bold design. Draw a triangle, then draw another triangle inside the first triangle, and color it in with black ink. Add marks along the triangle to create texture. Between each of the triangles, add a dot.
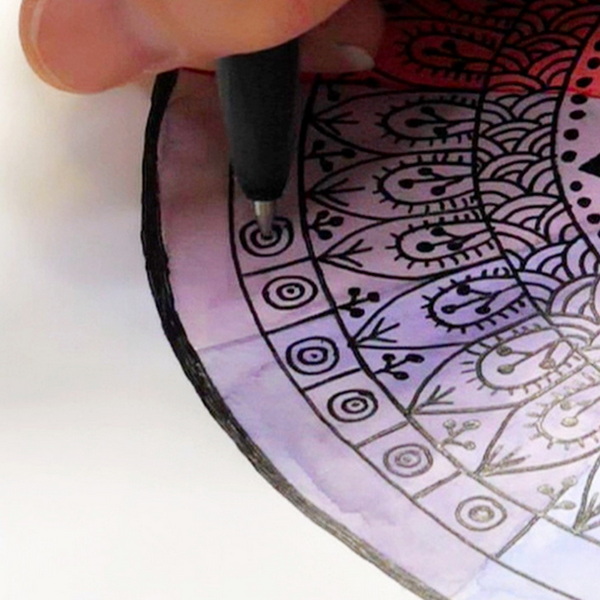
Outside the Mandala Circle
You can choose to add journaling or additional images outside the circle. For this mandala, I created a large, flatter petal shape and added part of a daisy flower in the center of each petal.
How to Get a Consistent Mandala Image
To get a consistent mandala image, pay attention to the lines that are created by the color wheel. These guidelines are helpful for keeping your design balanced. By having them as a reference, this makes it much easier to have every image be a similar size and shape.
If you’re not starting with a color wheel with your mandala, you’ll still want to add in the angle lines in pencil. This helps you maintain more even shapes and you can erase the lines later. Following these tips will help you get more consistency in your shapes.
Turn the Paper
By turning the paper as you’re working, this will make a big difference in how consistent your design is. This is why I don’t generally create mandalas directly into my art journal. I can easily turn the paper when it is a single sheet, and this gives me great results.
Any Questions?
Is this your first time creating a colorful mandala or any sort of mandala? I’d love to hear your experience with this project and if you have any questions! As you can see, by following some basic steps you’ll be able to get great results every time! Please leave your questions and comments below, I’d love to start a conversation with you!
Project Supply List
Every time you purchase from the affiliate links below, this supports my website (at no additional cost to you) and lets me bring you new content every week. Thank you for your support!
This 2-in-1 ruler and compass lets you draw circles from 1" to 12". Place the center disk hole on your starting point and choose your desired circle size (in 1/8" increments). Insert the pen into the hole and then hold down the center disk. Sweep around with the pen in the hole until the circle is complete.
Three tools in one! The Helix Angle and Circle Maker is a 360° protractor, compass, and circle template that enables you to measure angles just as you would using a standard protractor.

- Highly durable pencils in a range of hardness degrees
- Travel tin offers protective storage while in transit
Includes a metal tin containing six pencils, one each of 8B, 6B, 4B, 2B, B, and HB.

Includes 1/2" spaced holes for centering, 1/16" outer edge marks and 1/8" grid with inch marks. The transparent ruler allows you to see your project under the ruler for accurate positioning and marking.
- Quality student-grade range
- 40+ colors, including modern and historic pigments
- Strong tint strength
- Reliable transparency and lightfastness
- Uniform consistency for beginners and students
- 24 ergonomically slanted wells with two (2) generous mixing areas
- Removable mixing tray for easy cleaning
- Colors appear the same on both the palette and watercolor paper
- Leakproof and airtight palette for watercolor or oil paint keeps colors fresh for weeks

- This 360 degree rotatable color wheel help you to understand color relationship and make choices and combinations easier.
- The front side shows basic principles. Just spin the wheel and you will find the color mixing results in the window.
- The back side indicates the color relationships such as complementary colors and triad colors. It gives you more color combo inspiration when creating.

My favorite, yet inexpensive watercolor brush. I purchased these for a class on a whim and now use them in my watercolor and mixed media work. Round watercolor brush set includes Sizes: #2, #4, #6, #8, #10, and #12.

Pilot's Precise Black Pen features a precision tip that delivers clean and accurate lines every time, making your writing or creativity come to life with remarkable detail
- Stiff, heavyweight sheets for final artwork
- Available in Smooth and Vellum surfaces
- 100 lb / 270 gsm
- Acid-free

Excellent for erasing and highlighting with pencils, colored pencils, charcoal, and pastels, the Faber-Castell Kneaded Eraser is the perfect artist's erasing tool.