Adding Your Own Art to Stencil Images
Today I wanted to share with you a way of adding your own art to stencil images. Many of us struggle with our drawing skills, so we often use stamps or stencils to help us create images that we are happy with.
I was working on a scrapbook page recently and wanted a focal image that was larger than any of the stamps I owned. When I was looking for an image I found a stencil that was the correct size but it lacked the detail that I wanted for an image. The thought came to me, “Why not just add in the detail by adding in my own art to the stencil image?”
The Project
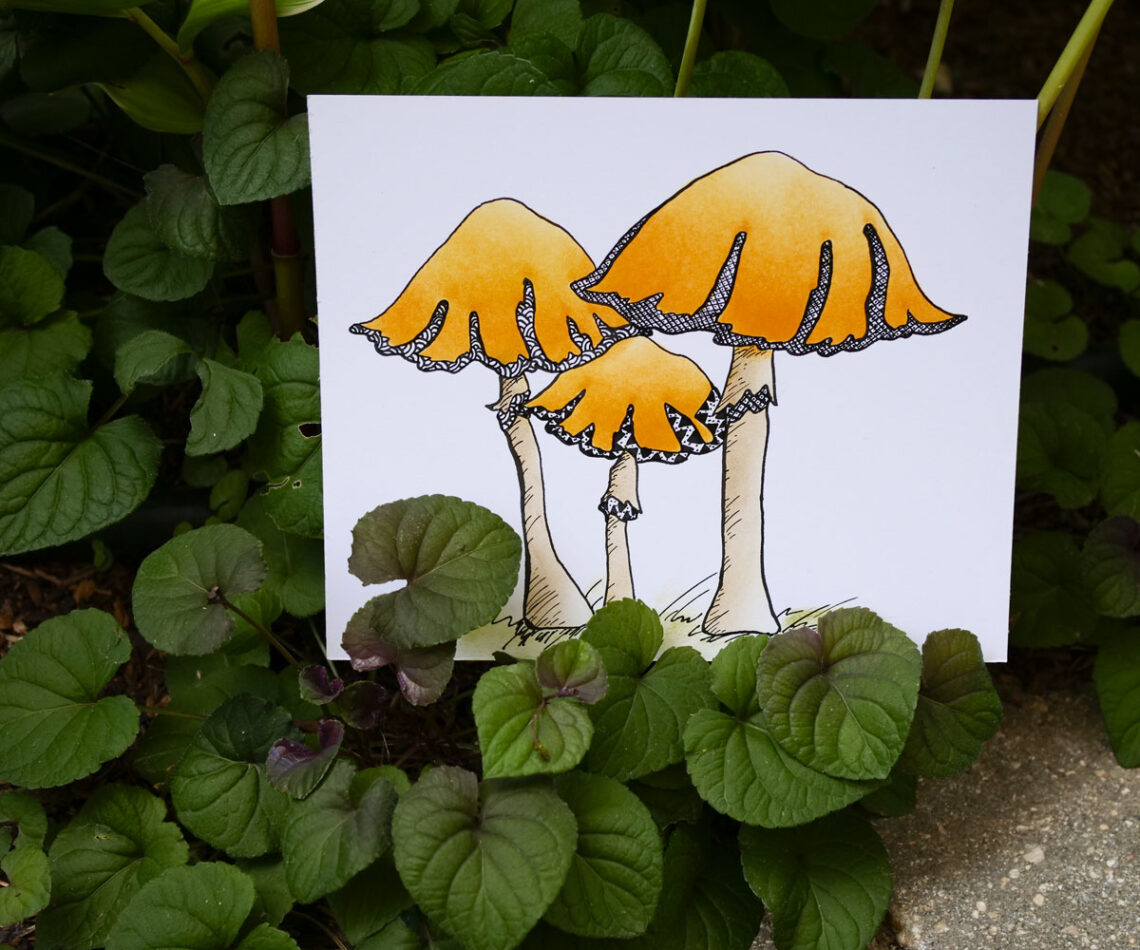
Starting with TCW Whimsical Shrooms stencil and Tim Holtz Distress Inks, I inked through the stencil onto smooth cardstock. This resulted in adding depth by adding several colors of shading. It also gave me a defined shape to start with. From there I outlined the colored areas and added additional lines to create the shape. To add a bit of my own flair to the piece, I added in some fun doodle designs. By doing this I turned a more basic stencil image into something much more dynamic.
For this project, instead of cutting out the images for a project, I decided to turn this image into a card. The wonderful thing about this technique is the versatility. It can be used on many different projects: a journal, scrapbook page or a card.
Dip Pens
I have recently fallen in love with dip pens. The more that I work on my pen and ink drawing skills, the more I enjoy working with dip pens. It forces me to be looser with my strokes and work more quickly. The result of using a nib that gives me thinner and thicker lines is that I have greater variation in my work. I love using Speedball Super Black Waterproof India Ink as I do not have to worry about it bleeding and running. I would suggest giving a dip pen a try, a project like this is a great place to start. By using a simple image, it is easy to practice the strokes you will need for more elaborate pieces.
If you do not have a dip pen, or are uncomfortable using one, I suggest using any pen that allows you to add detail easily. If I am not using a dip pen, I usually use either Sakura Pigma Micron pens or Faber Castell Pitt Pens. When using these pens make sure that your image is fully dry before adding pen work. By using smooth paper it can help prevent wear and tear on your pens and damage to the nibs.
Finding Self-Care in the Process
I try to find purposeful self-care in the process of making art. It would be easy to buy an embellishment or stamp instead of doodling or inking. But I like adding a personal touch to my projects. It may take more time, but the practice of relaxation that comes from drawing and doodling is important. By choosing these moments to slow down the pace, to relax our bodies is an important way to care for our emotional and physical health.
What I love about this project is that it needs few materials: a stencil, ink, and a pen. You probably already have everything you need. These moments of going slow, of taking some time to enjoy building a skill can be the best part of our day. This is an activity that takes very little time. Adding some doodles to an image can take as little as 5 or 10 minutes but what it does for our sense of restoration is so important.
These small things, like adding your art to stencil images, can help build a self care habit that lets us slow down and enjoy creative time.
Project Supply List
- Creative Scrapbook Super Stock
- Tim Holtz Distress Ink: Wild Honey, Fossilized Amber, Spiced Marmalade, Antique Linen, Frayed Burlap, Vintage Photo
- Tim Holtz Washi Tape
- Stencils: TCW578 Whimsical Shrooms
- Ranger Mini Blending Tool and Foams
- Dip Pen and Nib
- Speedball Super Black India Ink
- Alternative Pens: Faber Castell Pitt Pens or Sakura Pigma Micron Pens


