Wet on Wet Watercolor Technique
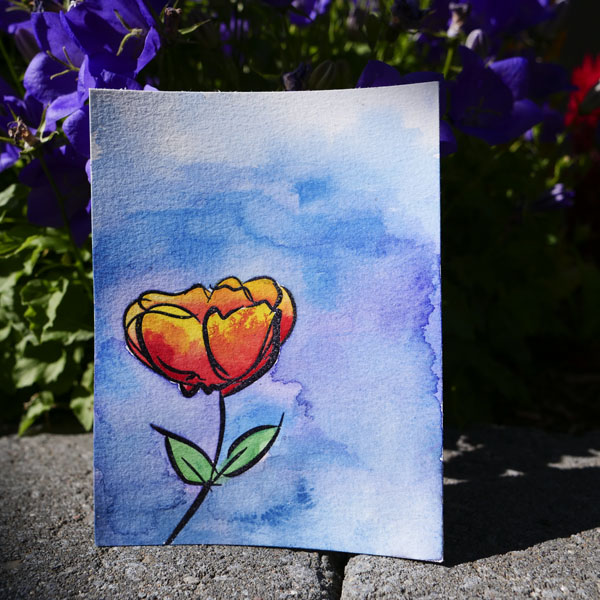
This week’s project is an easy watercolor card using a wet on wet watercolor technique. I have been watercolor painting more lately as part of my personal self-care routine. Setting up your space for watercolor painting is so easy. All you need is watercolor paints, water and a watercolor sketchbook or a pad of watercolor paper. The easy set up gives you more time to paint when you don’t have unlimited time. Lately, I’ve only had about a half hour a day for painting, but I can do a lot in that time when I am painting with watercolors.
Part of building a healthy self-care habit is making a point to have these moments of restoration, to breathe and find a slower pace in our lives. I started a new job recently and have found my schedule has become quite full. When I finish work I’m tired, but I am keyed up from the busyness of my job. I have found to be able to relax and slow my mind and my body, having an outlet like watercolor or sketching is really important. It helps me to slow my mind and focus on the moment and on my painting. In the short time that I have, I feel more calm and centered. Practices like watercolor are becoming an important part of my self-care habit.
The Technique
The technique of wet on wet watercolor is probably one of my favorite ways to watercolor, but also one of the most challenging. With wet on wet watercolor technique, the intent is to add a wash of clear water on the watercolor paper before adding in color. When color is added, the paint moves and the color blooms in interesting ways across the paper. This is what makes this technique fun but not easy to control.
It is one of the techniques that I love but find extremely challenging. It requires understanding how the paper, paint and water work together. Instead of controlling the outcome, I must leave space for some interesting surprises. It takes practice, but I believe it’s a great technique to add to your watercolor painting knowledge.
The Project
To make learning the wet on wet technique a bit easier, I started this project with a stamped and heat embossed image. If you would like to see the step by step video of this heat embossing technique, please click here. By using a stamped and embossed image, it makes working with the wet on wet technique easier when you are learning. The heat embossed image resists the paint so it is easier to control.
Why is this important? When you are working wet on wet it can be hard to control the direction and spread of the paint. By using an embossed image, the embossing works like a dam. It holds the paint within the area that you are painting and prevents the paint from spreading further than you would like.
In the video below I show a step by step tutorial on how to use the wet on wet water technique in this card. This technique is used in both the flower and the soft, blended background.
Project Materials
- Martha Stewart Crafts Heat Embossing Tool
- Judikins Clear Detail Embossing Powder
- Ranger Archival Ink Jet Black
- Embossing Tray
- Paint Brush
- Acrylic Stamping Block
- Dina Wakley Stamp Set Abstract Blooms
- Hot Press Watercolor Paper
- DaVinci Cosmotop Spin Watercolor Brushes
- Windsor and Newton Cotman Watercolors: Permanent Deep Red, Alizarin Crimson Hue, Hooker’s Green, Viridian Hue, Lemon Yellow, Cerulean Blue Hue, Turquoise, Prussian Blue, Dioxazine Purple, Chinese White.
- Windsor and Newton Iridescent Watercolor Medium
- Water Containers & Water
Thoughts?
I would love to hear from you! Please let me know if you enjoyed this project and if you have any questions or comments.


