How Grid Drawing Can Improve Composition
As it is the month of Inktober, I wanted to share with you about how grid drawing can improve composition. I have spent a considerable amount of time this year working on my drawing and painting skills. One realization that I have had is how much I rely on grid drawing in my compositions for drawing and painting.
Learning to Draw
As I have been learning to draw this year, I realize that sometimes I struggle with good composition and perspective in my drawing. I used to believe that I was really observant. The more I draw, the more I realize how my eyes sometimes play tricks on me. What I think I am seeing and what the image actually portrays are two completely different things.
Perspective and Composition
As I have been practicing drawing, I’ve realized how often I’ll be working on a drawing, and partway through realize that there is something wrong with the perspective or composition. I often ask my husband for a critique as he is very practiced in perspective drawing.
He will take a quick look at it and say, “the eyes are in the wrong place” or “the horizon isn’t quite right.” Because he has a trained eye for perspective and composition, he can pick out immediately the errors in my perspective and composition. I appreciate that he doesn’t just critique, he also helps. He pulled out some of his textbooks on perspective drawing and has helped me with my drawings.
How to Fix a Drawing
So how do we easily fix a drawing when we make mistakes and do not have someone to help us? One easy way to start off successfully is using the grid drawing method before you start to draw your image.
If you would like to see a video demonstration of how to use the grid drawing system, please see the video below.
What is the Grid Drawing Method?
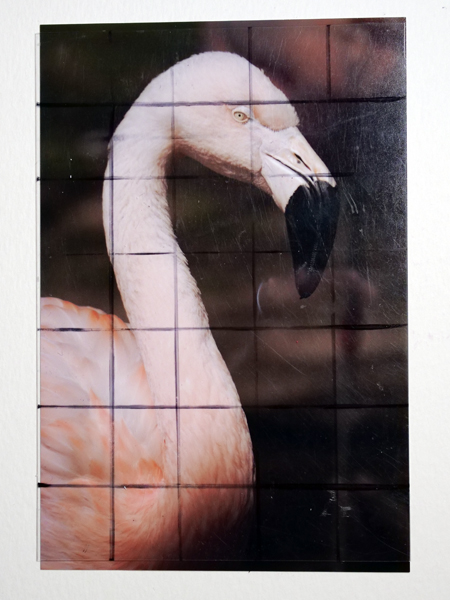
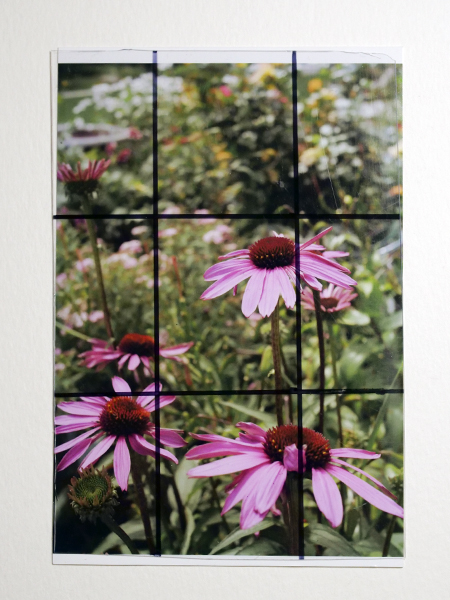
The grid drawing method is simply creating a grid on your reference photo as well as the surface that you are drawing the image. It requires using a grid with equal sized squares, but the grid on your reference photo and the grid on your drawing surface don’t have to be the exact same size. They just need to have the same number of squares.
Creating a Grid
When creating a grid, I use several different tools. If I am working on a photo that is on my phone, I use a free app that overlays a grid over the photo. If I am using printed photos, I use a piece of clear acetate or a binder sleeve and a permanent marker to draw a grid on the surface. I can then lay this grid on top of my photos so that I can easily use the grid reference. For my reference images, I usually use ¾” or 1” squares but adjust to a larger size if I am using a larger reference photo.
Creating a Grid on Your Drawing Surface
The next step is to create a grid on your drawing surface. The idea is to use the same number of squares that you use in your reference image. Please note that this doesn’t mean that the squares have to be the same sizes. By using the same amount of squares on my drawing as I do in my reference photo, this allows me to easily draw my image.
The grid drawing method allows you to break your image down into sections. Once your grid is in place, you start at the first square. By looking at what is in the first square of the reference photo, you can easily draw what you see in the square. It is much easier to correctly draw in perspective because you are not trying to draw the entire image and the grid gives you a sense of scale. Instead you are drawing one tiny piece of the image. Once you draw what is in square one, you move to square two and do the same thing until you have drawn the entire image.
The Benefits of Grid Drawing
Scaling Up an Image
The benefits of grid drawing are if you are trying to scale up an image to be painted or drawn on a larger surface, this can really help with determining scale. What may be a 1” square on your reference photo, might be a 4” square on your canvas. It’s a great way to enlarge a picture when you may not feel confident to increase the scale by drawing freehand.
Getting your Ideas Down Quickly
Grid Drawing also helps you get your ideas down quickly. It might seem like it takes a lot of time to put a grid down on your surface, but it is generally faster than drawing freehand if you are new to drawing. It helps me build confidence by not having to guess whether or not my drawing composition is correct.
Why a Grid Can be Helpful
In one of the art classes I was in recently, I saw an example of this. I was working on a 30” by 40” canvas and I wasn’t totally confident that I would be able to accurately add my subject to the canvas. The reference photo that I was using was 8×10 image. I took a few minutes to calculate the grid size, scaled it up for my canvas and drew my grid.
When I add my grid to a canvas, I use pastel pencils so that the grid can be easily covered up with the paint. Within a couple of minutes I had painted out the basic shape of my animal and was able to start really working on my painting. It’s a great way of getting your ideas down quickly and accurately without getting caught in wondering if your perspective is correct.
What was interesting was in the time it took me to draw my grid, paint in my basic shape and start filling in the areas with color; one of the other students was continuing to struggle with composition because she decided not to draw a grid. I’m not saying this to be critical, but to reinforce my point. For a long time, I believed drawing a grid would take too long. Often I would be part of the way through my painting and realize that my eyes were in the wrong place. I would have to paint over sections of my painting and start over. By using a grid I save myself time, frustration and generally end up with a better composition.
Adjusting Position and Perspective
Grid drawing is also great for helping you to adjust position and perspective. If you want less background and your subject larger in the drawing or painting, it can be as simple as adjusting what squares you reference for your drawing. I usually use a combination of rule of thirds and grid drawing when I am choosing and laying out my composition.
What is the Rule of Thirds?
As a photographer, I’ve been using the rule of thirds for years in my photography. When I started to paint, I realized how many artists do not know about the rule of thirds or know how to apply it. I have seen talented painters that make beautiful paintings but struggle with composition.
The Rule of Thirds is taking your photo or image and dividing it into thirds both horizontally and vertically. When you do this, you have 4 intersecting points. These points are what are considered your “sweet spots” for composition. If you subject is touching or close to one of these 4 points, it will create a stronger composition. This is why drawings with the subject right in the center of the frame are not always very interesting.
In the video above I walk through how you can use the rule of thirds to adjust your image to make it stronger. By making small changes, it can make your overall drawing more interesting and dynamic.

How About You?
Have you ever tried using a grid drawing method or the rule of thirds in your drawing or paintings? I would love to hear your experience with it. If you haven’t, I would recommend that you give it a try. I have found these techniques helpful and effective for getting the most out of my creative time. If you have any questions on how grid drawing can improve composition, I would love to talk with you about it. Please leave a comment below or to contact me directly. I would love to start a conversation or be able to help you in your artistic journey.