How to Use Watercolor Paint
This week I wanted to share with you how to use watercolor paint. I first attempted watercolor painting a few years ago and found I really enjoyed it. It can be fun and relaxing, but also challenging.
Watercolor Painting and Self-Care
Watercolor painting is one of my favorite activities when I am working on my personal self care. It does not require many materials. The paint can be re-wetted so I can work on a painting for a short period of time without worrying about wasting materials. It is a paint that requires minimal clean up. Watercolor is an ideal activity when I have only a few minutes for self-care but want to choose an activity that promotes restoration.
Watercolors require me to loosen up and try not to control the outcome. If you let yourself relax and enjoy the fact that the paint has a mind of its own sometimes, you can get some wonderful surprises.
The Basic Materials
I found watercolor a little confusing at first. Watercolors required different brushes, different paint, and different paper. There was so much to research and learn when I first started painting with watercolor.
To make this a bit easier for you, here are a few things that you should consider when you start watercolor painting.
High Quality Watercolor Paint
I discovered quickly that high quality watercolor paint makes a difference when painting watercolors. You get what you pay for. The binders and the pigments can make the difference between a good and bad experience with watercolor. High quality watercolor has strong pigments that make the colors rich and vibrant. They are also very easy to mix, blend well and make the painting process very enjoyable.
Poor quality watercolors are often dull and are either very transparent or are so opaque they do not have the look and color that you would expect from watercolor. They are also very difficult to blend and are hard to create color gradients with.
Choosing Paint
So, what does this mean? Do you go out and buy the most expensive professional artists watercolors available? Absolutely not! For many of us when we start out, we are not sure how much we will enjoy watercolor, so we don’t want to invest too much money into it at the beginning. It is still important to stay away from really cheap paint because you will not get the results you expect.
My first set of watercolors was a gift from my husband. It was a Koi Watercolors Pocket Field Sketch Box. He chose them because they are quality watercolors and are in a travel box so that they can be used outside. If I wanted to move to higher quality watercolors, this set was still useful for urban sketching or water coloring in the garden.
I used this set for a year or so and eventually moved up to a set of Windsor and Newton Cotman Watercolor Paints. They are not professional artist paints but are a high-quality paint. They have all the aspects of a good quality watercolor but are in a price range that I can afford.
Watercolor Brushes
Watercolor brushes are different than acrylic brushes. They are designed to hold a large amount of water. They come in many shapes and sizes; I have brushes ranging from 000 up to 12. It is important to only use watercolor brushes for watercolor painting, if you use them for any other type of medium, you will damage the brushes. It is also important not to leave your watercolor brushes in water and always lay them flat to protect them so that you do not damage them.
Watercolor brushes come in a variety of shapes, sizes, and prices. The brushes I use are synthetic watercolor brushes which is a more affordable option than the natural hair brushes. Most of my watercolor brushes are DaVinci Costmotop Spin brushes but I also have brushes by Holbein, Princeton and Windsor & Newton. I generally use round watercolor brushes and I have a range of sizes. When purchasing brushes, I would start with a large wash brush (size 8 to 12) as well as some finer brushes for doing detail work (size 0 to 6).
I would suggest getting help from your local art store to help you choose brushes that are best for you. I started by purchasing a few brushes and from there continued to add to my collection. This way you will get a sense of what you like using in your watercolor work.
Watercolor Paper
Watercolor paper comes in different weights and sizes, but can generally be put into one of two categories, hot press or cold press watercolor paper. There is a lot involved with the processing of both types of paper, but to simplify, the most important thing to know is that cold press is a rougher, more absorbent paper and hot press is a less absorbent and smoother paper.
I use cold press watercolor paper when I am doing watercolor paintings. It is great when you are exclusively using watercolor paint. It takes color well, absorbs paint quickly and does not buckle with water if the paper is heavy enough and you don’t go crazy with the water.
Hot press watercolor paper I use for projects where I will be stamping, using a dip pen or for creating pen and ink drawings. Dip pen nibs appreciate a smooth, absorbent surface which hot press watercolor paper provides. It is less absorbent than cold press watercolor paper, but I often trade off the absorbency for being able to draw on the paper without my pen skipping or wobbling.
Paper Weight
When choosing watercolor paper, paper weight does make a difference. When I use 80lb or 90lb watercolor paper sheets, unless I tape the paper down, I do expect curling and buckling of the paper. The lighter the weight of the paper, the more limitations you have on how much water can be used.
Where possible I like using 120lb or thicker watercolor paper for my projects. It absorbs water well, does not buckle and I get great results with this paper. I only use this paper in my journals and more serious watercolor projects. When I am making cards I generally stick with 90lb watercolor paper as a cost saving measure.
The Watercolor Card
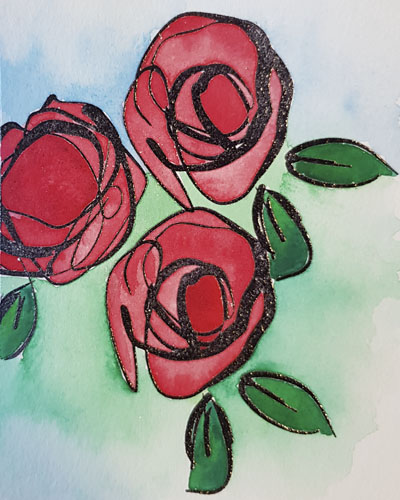
In this week’s watercolor card project, I wanted to share with you a simple way to use watercolor paint. For those who may not have strong brush control or do not feel confident with their drawing skills, this technique can help improve your brush skills without feeling frustrated.
This watercolor card project starts with stamping and heat embossing the hot press watercolor paper. I have created a video tutorial demonstrating the process.
Once the paper is heat embossed, this gives you a more controlled way to add watercolor paint. As the embossing resists the watercolor paint, this can help you practice brush control and will help you keep the paint inside the lines. I have the full step-by-step tutorial for this project.
Project Materials
- Martha Stewart Crafts Heat Embossing Tool
- Judikins Clear Detail Embossing Powder
- Ranger Archival Ink Jet Black
- Embossing Tray
- Paint Brush
- Acrylic Stamping Block
- Dina Wakley Stamp Set Abstract Blooms
- Hot Press Watercolor Paper
- DaVinci Cosmotop Spin Watercolor Brushes Size 2 and 4
- Windsor and Newton Cotman Watercolors: Permanent Deep Red, Alizarin Crimson Hue, Hooker’s Green, Viridian Hue, Lemon Yellow, Cerulean Blue Hue, Turquoise.
- Water Containers & Water
Any Questions?
I hope that you enjoyed this watercolor tutorial and it has given you some confidence on how to use watercolor paint. I would love to hear from you on any questions or feedback on this tutorial. Feel free to comment below or to contact me directly.


