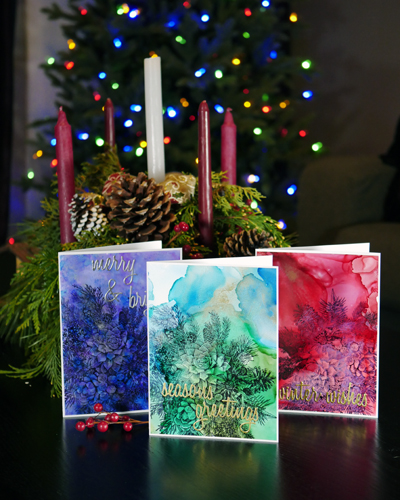
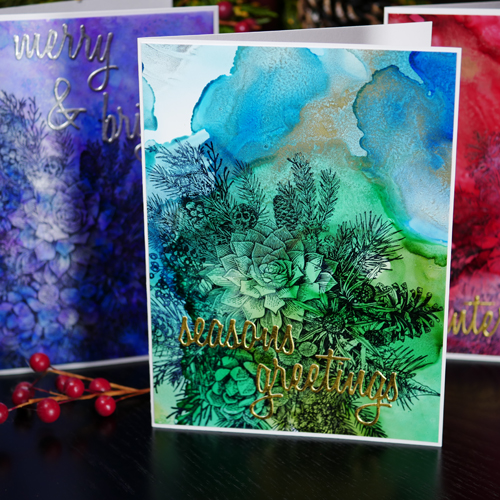
Easy Alcohol Ink Christmas Card
This week I want to share with you one of my favorite easy alcohol ink Christmas card designs. I love using alcohol inks and Yupo as these mediums work so well together. I find the process of using alcohol inks to be very relaxing. It is an opportunity to create is a less structured manner and allows me to find mindfulness in the moment.
Alcohol Ink Christmas Card
What I love about this easy alcohol ink Christmas card is that every card is unique and different. The nature of ink is to flow and when used with Yupo, which is a slippery surface, you can get unexpected results. This means that no two backgrounds are the same which makes for a unique card.
Creating an Alcohol Ink Background
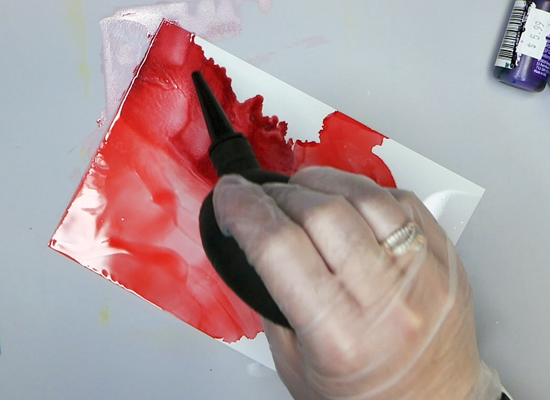
The first step to this project is creating an alcohol ink background. For this project I decided to use translucent Yupo in 5” by 7” sheets. I usually use white Yupo for most of my projects but decided to try something different for this project. Translucent Yupo is great if you like a semi-transparent look, or plan to add the Yupo to a mixed media project.

Using a Blending Tool
For alcohol ink projects that I plan to add stamped images to, I try to use a simple and monochromatic look to the background. Using a felt on a blending tool, I applied alcohol ink to the felt and added blending solution to help the colors mix better. I tapped the blending tool in a random pattern on the Yupo which gives a marbled effect to the paper. If you are not completely happy with the result, add more alcohol ink in a different color to get variation in layers and color values.
Using a Dusting Bulb
Another technique I use for creating alcohol ink background is using a dust bulb for cleaning camera equipment. This will allow you to move the ink across the page in a more controlled manner. I would not recommend using a straw or blowing close to the paper, as you may inhale some of the fumes from the alcohol ink.
The trick to using the bulb to effectively move the ink is to make sure that the ink has some flow. To do this, add a few drops of alcohol ink and a generous amount of blending solution. When I use the dusting bulb to push the ink, it will flow randomly across the page. You can use the dusting bulb to adjust the direction a bit, but it is a very loose technique.
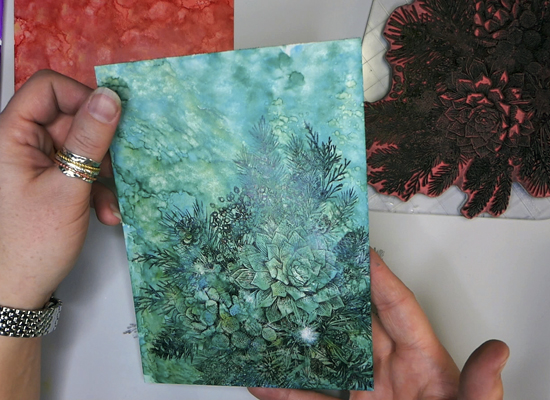
Adding Stamped Images
Once the alcohol ink is dry the stamped images can be added. As a rule, more detailed and less blocky stamped images work better in this design. This has to do with the surface tension between the ink and the Yupo. A more detailed image will usually give a more solid and clearer image on your project.
It is important to use the right ink when stamping on Yupo. As Yupo is a slippery plastic product, you will need to use an ink that works on a non-porus surface. I have tried both StazOn Ink and Archival Ink on Yupo and found that the Archival Ink works better for this project. The key is to give the ink a few minutes to dry after stamping.
I used my basic technique for stamping. Use a stamping block, add the ink to the stamp, and firmly press down. On large images, I usually add additional pressure when I am stamping to make sure that the image transfers correctly.
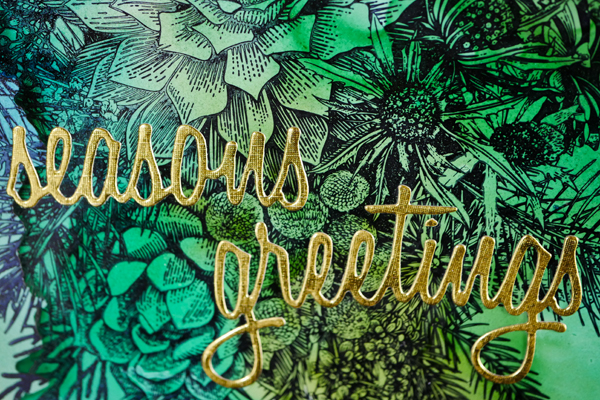
Adding Die Cut Images
Once the Archival Ink is dry, you can move on to adding in your greeting to your card. I was using Tim Holtz Sizzix Thinlits Seasons Greetings to cut out my greetings with metallic cardstock. As the mixatives that I used with my alcohol inks were silver and gold, I used these highlights in the cards to determine which greeting I would use.
For each card, I would look at where I stamped the image, the overall design and chose a greeting that fits or complements the design. By using the rule of thirds when placing my die cuts, this helps me to create a stronger card design.
Adding to a Card Back
The final step is to adhere the Yupo to a card back. I often will trim down my image slightly so that it has a small white frame around it when applied to the card back. I find that framing the image makes the image stand out more on the card.
Any Questions?
Do you have any questions about how to make this easy alcohol ink Christmas card? If you do, I would love for you to comment below or contact me directly. If you are interested in learning more about how to use alcohol inks in projects, I have a project using alcohol inks through stencils and using alcohol inks with die cuts. I hope that you give this project a try and find time for creative self-care this week.
Project Supply List
- Legion Paper Translucent Yupo 5” x 7”
- Blending Tool, Felts and Foams
- Tim Holtz Alcohol Ink Blending Solution
- Tim Holtz Alcohol Inks & Mixatives: Stream, Silver, Envy, Citrus, Poppyfield, Cranberry, Crimson, Deception, Alchemy, Gold, Aquamarine, Tranquil
- Jacquard Alcohol Inks: Rainforest Green and Baja Blue
- 90% Alcohol
- Dusting Bulb Air Pump
- Ranger Archival Ink Jet Black and Black Soot
- Tim Holtz Glorious Gatherings Stamp Set & Stamping Block
- Metallic Cardstock
- Tim Holtz Sizzix Seasons Greetings 660058 Thinlit Die Set
- USA ArtQuest PPA Glue