Gelli Printing with Die Cuts
Have you ever wondered how to make those lovely Gelli print backgrounds and how to incorporate them into your projects? This week I was playing with combining Gelli printing with die cuts and Pan Pastels and had some fantastic results!
Gelli Printing with Die Cuts
Gelli printing with die cuts is a great way to combine and duplicate images in your art pieces, cards, and journal pages. I love using die cuts in my prints and then cutting these same images for use as focal images on my page. I find that using a repetitive pattern in my pieces bring cohesion to my art.
What to do with Gelli Prints?
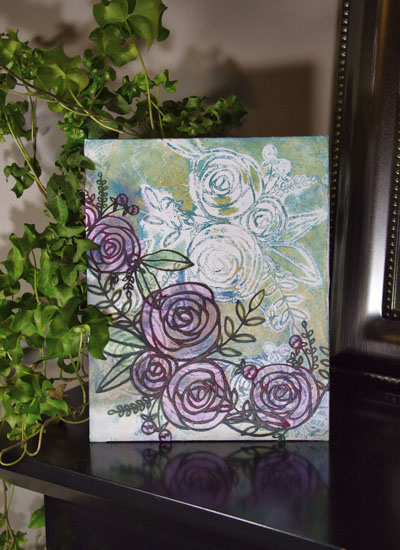
I find it fun and relaxing to make Gelli prints. Sometimes it is challenging to know what to do with the Gelli prints once you have made them. I have shared a few ideas on a previous post about how to use these Gelli prints in your art journals, cards, or canvas pieces. In today’s project we will talk about how to use these pieces on an art panel that can be framed and displayed.
The Mixed Media Project
In this mixed media project, I am sharing some new techniques for Gelli printing and how to incorporate them in an art panel with die cuts and Pan Pastels.
Make Gelli Prints
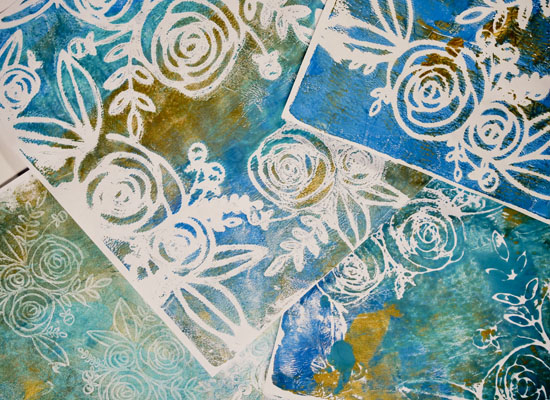
The first step for this project was to use an 8″ x 10″ Gelli plate for making prints. My main image for the printing is the floral SVG from Wild Whisper Designs. Using my Brother ScanNCut I resized and cut several different sizes of these floral images keeping them in scale with the size of my Gelli plate.
For these prints I chose 3 colors to use: Turquoise Blue, Cerulean Blue and Iridescent Gold. I varied the colors, images and paint application to have variation in the texture, design and color for these prints. For every application of paint, I made 2 prints to give me a greater variety of images to work with. If you don’t have a electronic die cutting machine, you can also use the Wild Whisper Designs Floral Stamp Set to get a similar result. To see the details of these prints, please see the video above.
Choosing your Surface
For this project, I am using an 8” by 10” art panel. I purposely chose this size because it is the same dimensions as my Gelli Plate.
If you find using a canvas intimidating, I suggest trying art panels. Art panels are inexpensive. They are made of canvas wrapped around a board and usually double primed. This is an easy way to gain confidence working on a piece without feeling intimidated by a larger canvas. These art panels can be framed, left as is, or used as a book cover.
Adhering the Print to the Panel
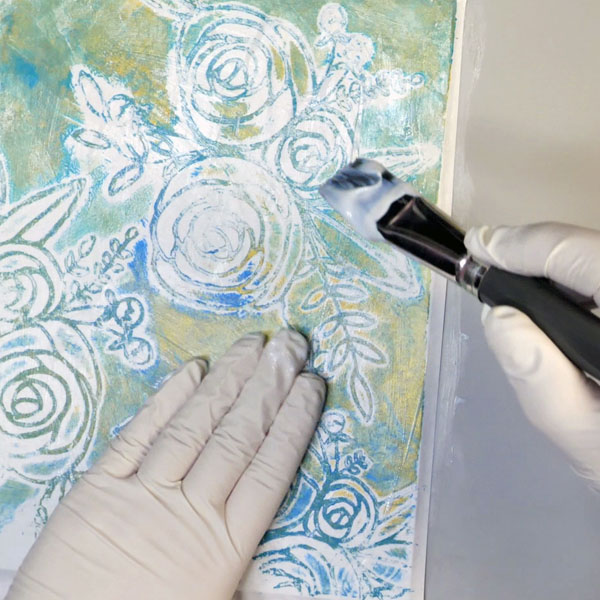
Using Golden semi-gel soft gloss or another gel medium, apply gel liberally to the panel with a brush. Place the Gelli print on top and smooth down with your hands. There may be bubbles between the print and the panel. Use your fingers to try to smooth out these bubbles.
Add a layer of gel medium on top of the Gelli print to seal in the print. Sometimes the edges might lift. If this happens, gently life the print, add more medium between the print and the board. Press down to seal. You should end up with a print that is completely covered with a thin layer of gel medium. Set the panel aside to dry and clean your brush thoroughly.
Cleaning Up Panel Edges
Once the panel is dry, cut or tear the excess paper away from the panel edges. If you have small bits of paper along the edges that you would like to smooth down, use gel medium to adhere them to the edges of the panel.
Adding Die Cut Images
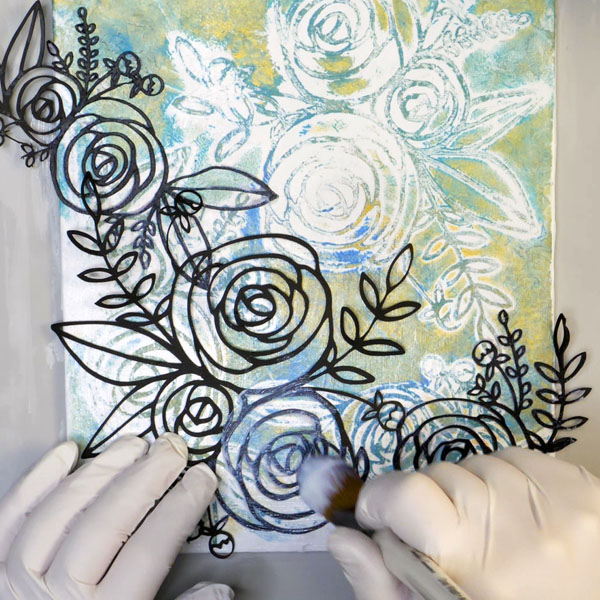
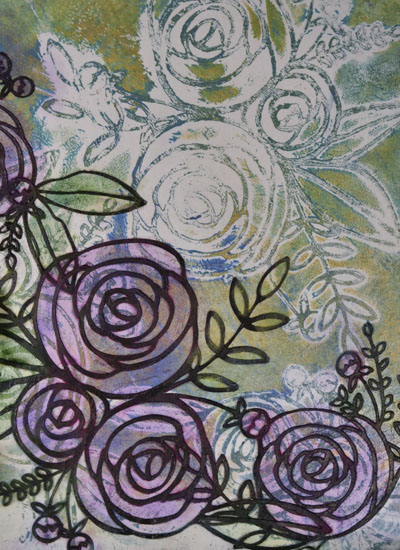
Using a Brother ScanNCut or another electronic cutting machine cut additional images of the Floral cut file from black cardstock. Using gel medium, add these die cuts to the art panel. Try overlapping the images and use one image that is larger than the others. This will add a focal element to the piece. Add gel medium to the Gelli print on the art panel, then place the floral image on the panel. Cover the top of the die cut with gel medium to seal it to the panel. Set aside to dry completely.
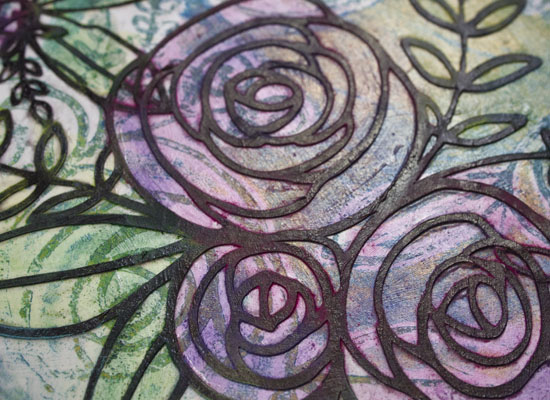
Adding Pan Pastels to the Flowers
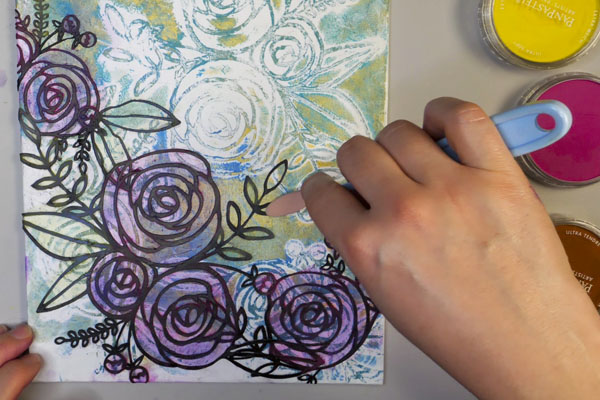
To add color to the flowers we’re going to use Pan Pastels. Using Sofft tools, apply Magenta and Violet Pan Pastels onto the flower images. By adding layers of pastel to the surface, this will give soft, translucent color to the images. To color the leaves, start with Bright Yellow Green and add in some Phtalo Green Extra Dark to add in some darker tones. For a more detailed tutorial on Pan Pastels, what they are and how to use them, visit this link.
Sealing Your Artwork
Make sure to seal your artwork before displaying your piece. You can either use a Workable Fixative to set the pastel or an Archival varnish that seals and protects your piece from UV fading.
What Do You Think?
What do you think about using Gelli Printing with die cuts? Do you like the idea of having one image repeated through the piece? I would love to hear what you think about this project, what you have learned and if you have any questions. Please comment below or contact me directly, I would love to hear from you! I would also love to see your work! Please use hashtag #hopalongstudio on Instagram if you try any of my projects. I would love to see your work and connect with you! I hope that you have a great week and take time for restorative self care.
Project Supply List
- Gelli Arts Gel Printing Plate 8” x 10”
- Wild Whisper Design Floral Stamp Set
- Wild Whisper Design Floral Cut File
- Surfaces: Staples Black 90lb Cardstock, 8.5 by 11” Copy Paper, 8” x 10” Canvas Board
- Pebeo Studio Acrylics: Turquoise Blue, Cerulean Blue and Iridescent Gold
- Golden Soft Gel Medium Semi-Gloss
- Pan Pastels: Magenta, Violet, Bright Yellow Green, Phthalo Green Extra Dark, Turquiose, Turquoise Shade, Ultramarine Blue Shade
- Tools: Brother ScanNCut, Sofft Tools, 1” Paintbrush, Brayer, Stamping Block
- Krylon Workable Fixative
- Other materials: Gloves, Scissors, Baby Wipes