How to Create Unique Art Journal Backgrounds with Plastic Wrap
Are you looking for unique ways to create layers in your art journal pages? Today we’ll talk about how to create beautiful and easy art journal backgrounds using plastic wrap.
One of the hardest parts about art journaling is breaking up the white space and creating unique backgrounds. We can get stuck at this first step and this can often interrupt our creative flow. This is where I look for things around my house to inspire me. Plastic wrap is a great art tool because it’s inexpensive and easily available. You probably already have some!
Hop-A-Long Studio is reader-supported. When you buy through links on our site, we may earn an affiliate commission at no cost to you. Learn more.
How to Create Unique Art Journal Backgrounds with Plastic Wrap
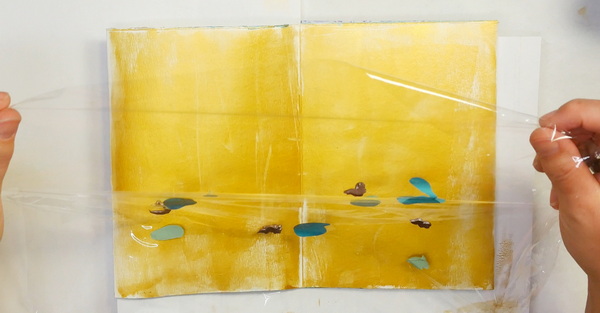
Creating art journal backgrounds with plastic wrap is very easy. Start with a piece of plastic wrap that is larger than your art journal page. You can choose to use this technique on a blank page, or you can add it to a page that has color already applied to the surface. This plastic wrap technique will also work on top of a collage background.
If you’ve never prepped a surface with paint to break up the surface, give it a try! It’s one of my favorite ways to get rid of the white in my art journal. For detailed instructions on how to break up a blank page, check out this article.
Adding Acrylic Paint to Plastic Wrap
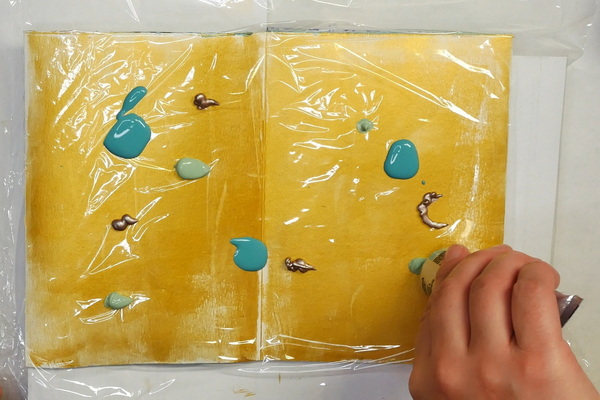
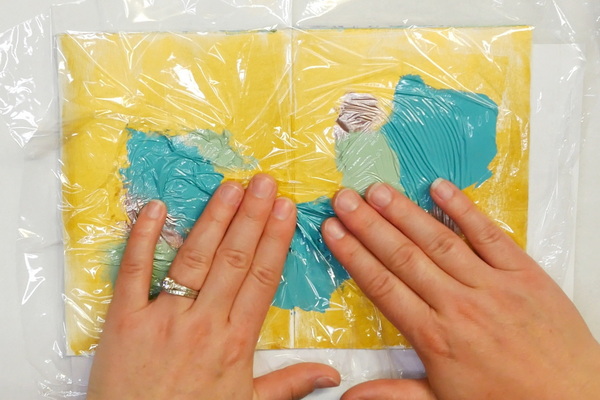
Once you have chosen a background, either plain or painted, lay the piece of plastic wrap on top of the page. Apply dabs of paint onto the plastic wrap while staying within the borders of the art journal page. The reason I complete this step on top of the art journal page is so that you can decide exactly where you want to apply your paint onto the page. This will also prevent you from adding paint to places that extend past the edges of the art journal page.
I try to add dime size amounts of paint to the plastic and vary the amount and placement of the paint on the page. If you add too much paint onto one area of the plastic wrap, take a palette knife and scrape it onto another area. Make sure not to add too much paint to the plastic wrap. You want several inches of space between each dollop of paint as the paint will spread out in the next step.
Flipping the Plastic Wrap
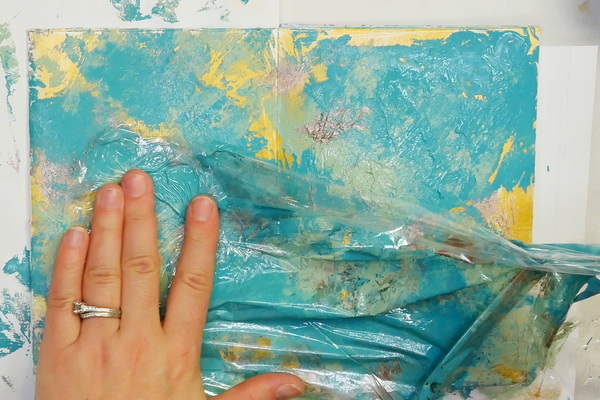
Pick up the plastic wrap and flip it over to apply the paint to the art journal. Be quick when flipping the plastic sheet so that the paint doesn’t flow off the plastic. I’m using a combination of craft paints and heavy body acrylic paint for these backgrounds. The craft paints are more watery, so you need to move quickly so that they don’t run off the plastic wrap. This is why I prefer Amsterdam Acrylic Paints or any other heavy body acrylic paints for this technique. They will stay put.
Once you flip the plastic over onto the art journal surface, start moving and spreading the paint with your fingertips. I like to bunch up the plastic wrap in areas as well to create unique textures in the paint and create interesting color combinations.
Pick up the plastic wrap, reposition it on the page, and repeat the same step. Using your fingers, spread and bunch the paint through the plastic. Continue to do this as many times as you like to create a beautiful base layer of paint. You can choose to leave a lot of white space or you can cover the entire surface with paint, the choice is yours. I like to leave some white space or the colored space below just to create more interest on the page.
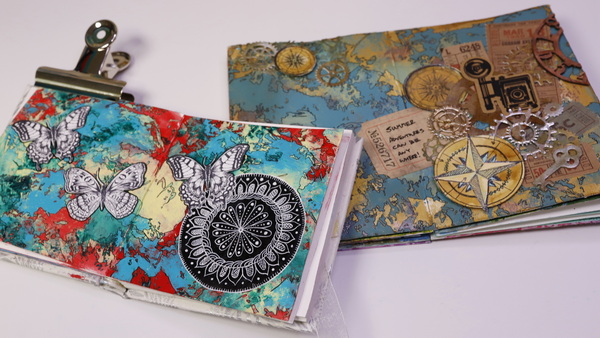
Using this technique to create unique art journal backgrounds with plastic wrap can give you a variety of results. Here are several different backgrounds I created using this technique.
What Can We Do with These Plastic Wrap Backgrounds?
These art journal backgrounds that we’ve created with plastic wrap are easy to create. It’s a great way of breaking up the blank page, but where do we go from here? Let’s talk about several ways we can alter these backgrounds depending on the look and feel you want to create on your page.
I originally learned this basic technique from Alisa Burke in an online art class, so I want to make sure to give her credit for this idea. But now, I’m taking this fabulous concept and putting my own spin on the idea to complete my art journal page.
Adding Doodling and Drawing
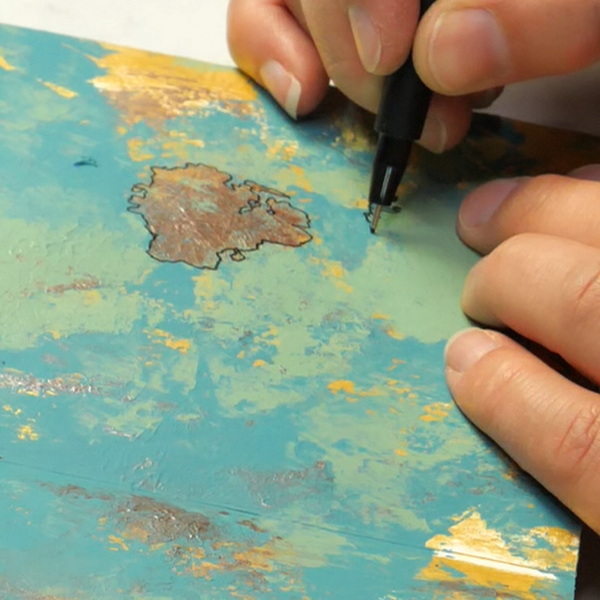
At this point, you can start adding in details to the background. You can outline areas of color, you can trace around edges, there are so many ways you can create beautiful designs on your background. I love to go crazy with the details on these pages, but you can go a simple or as complicated as you want.
You can use a variety of pens for this next step, just make sure that your project is fully dry before adding permanent pen to it. You’ll know its dry if you touch the painted surface and it is room temperature. If it’s still cold, this means that the paint hasn’t fully dried. If you add pen to a tacky or wet surface, you may ruin the tips of your pen.
For this project I am using a combination of Faber Castell Pitt Pens and a Sakura Micro Perm black pen. I want to use these pens specifically because they are permanent. This means if we decide to add in more paint or wet layers, they won’t bleed or run.
If you don’t feel like just tracing the paint shapes, you can add your own drawing, stamping, and doodling in any shape. I like to use these unique backgrounds to draw leaves and flowers, and then fill them in with pastels, paint and other mediums.
Finishing off the Art Journal Spread
From this point, I’ve chosen to share with you how to complete two of these art journal projects in very different styles.
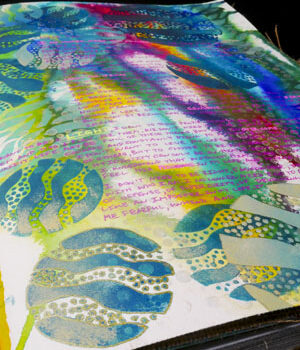
Finishing off An Abstract Background
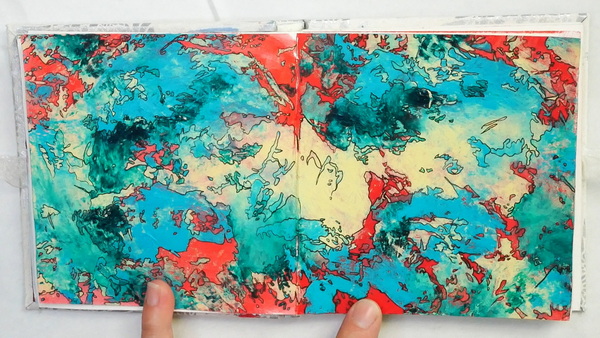
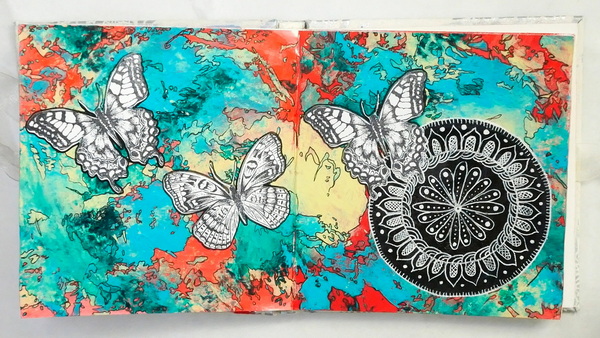
For this first art journal page, because I started with a red background, I specifically meant for this to be an abstract background. I love to take these projects with me to appointments, to church, or just sit on the couch to work on all the small details. It’s easy to sit anywhere and outline the shapes of the paint details with my Faber-Castell Pitt Pen. I love that adding in the small details makes for a very interesting background. Instead of an indistinct background of color, it becomes a design feature.
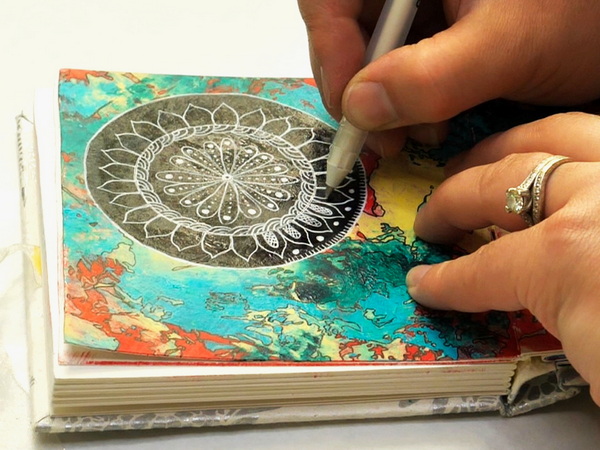
Adding in a Mandala
Now it’s time to add in some additional layers of color and design. Using your favorite circle maker tool, (mine is the Helix Circle and Angle Maker), add a circle onto the page. Fill it in with black paint or with your favorite permanent marker. I recently picked up a Tombow Mono Twin permanent marker with a bold tip. This made it easy and fast to add black over top of the acrylic paint.
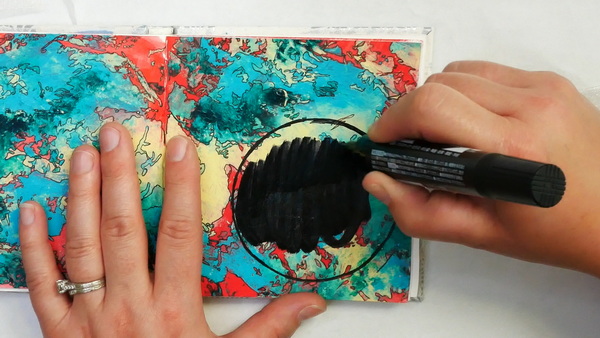
You can eyeball your circles, but I like using the Helix Circle and Angle Maker with a white pen to add in my guidelines for my mandala shape. Using a variety of your favorite patterns, add designs to create a mandala. If you’ve never created a mandala before, check out this article.
Adding in Final Imagery
I had some butterflies that I had created by stamping the Tim Holtz Flutter stamp set using Jet Black Archival Ink on white cardstock. Using Art Glitter glue, add your focal image to the page. Because of the bright colors and details in the background, to help the butterfly images stand out, try outlining them with a Posca Black paint pen.
At this point, I’m not sure if I really want to add journaling to this page. Some of my art journals are a place to play with techniques, others are for journaling and a lot of personal writing. At some point in the future, I can make the choice to add in some journaling. You don’t always have to complete a page in one session. A time may come when the inspiration to finish the page comes to you.
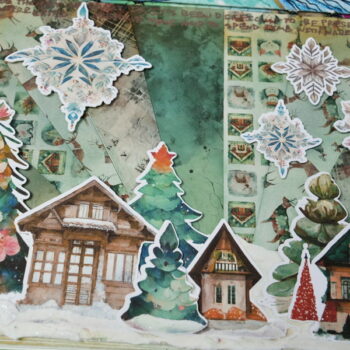
Creating a Map Background & Vintage Page
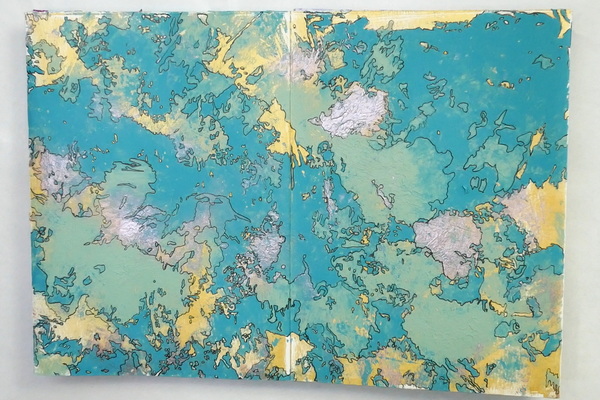
For this second background, I purposely chose colors that would make the background look more like a map. When outlining, try to keep in mind the idea of land masses when adding in details. Because of the colors and the way I added the details, this gave the page a feeling of a map over an abstract piece.
Adding Distress Ink Stains
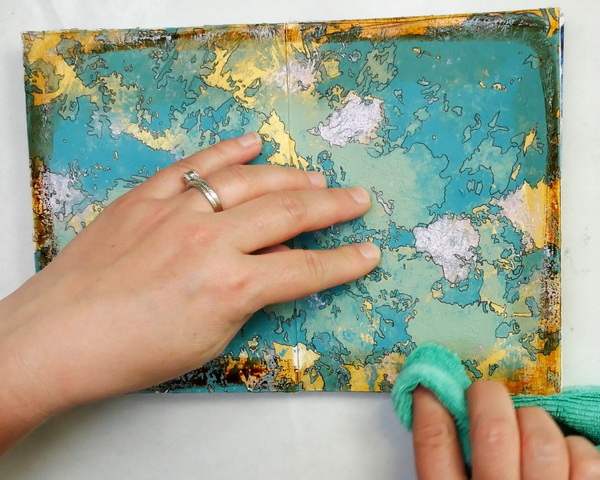
To create a vintage feel to this page, add a bit of Vintage Photo Distress Stain around the edges. The version of this stain I have has a soft applicator, but it has been changed to a spray bottle style applicator. Apply it straight to the page and use a towel to blend and wipe it off in areas. This way the edges have a softer, more vintage look, while the center remains the original color. By adding it only in some areas, this creates variation to the page which I always like in a vintage piece.
Altering the Ephemera

I recently reorganized my ephemera and wanted to use some of the slimmer pieces on this project. (Keep an eye out, in a few weeks I’ll be sharing an entire series about organizing your art space!) I used a variety of stamped and die cut images as well as Tim Holtz Idea-ology Ticket Book ephemera. Some of these pieces were white and other ones already had a vintage feel.
To give these pieces a sense of harmony I used a variety of Tim Holtz Distress Stains to alter the colors so that they fit better in the page design.
For some larger images where I wanted to have more control over the color (like the compass rose), I used an Arteza Water Brush and Distress Stain to color in specific areas.
Finishing off the Art Journal Page
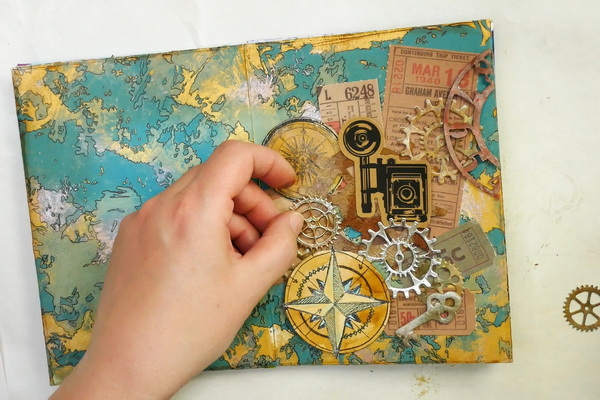
Start playing around with your design by arranging your found objects and ephemera pieces. I chose a few focal images that I wanted front and center and arranged the other pieces around these focal images. I followed the rule of thirds when creating this composition, which is why the main focal images are in the bottom right-hand corner.
If you don’t know what the rule of thirds is, check out this article where I explain some basic rules of composition.
I found that the arrangement was very focused on the bottom right-hand corner. To balance this out, I added in a few images to the top right-hand corner.
Once I come up with a design, I ALWAYS take a photo before gluing. This way I know where all the pieces were meant to go. I like using Art Glitter glue in projects like this as it will adhere objects of different weights and materials without trouble.
Adding in Journaling
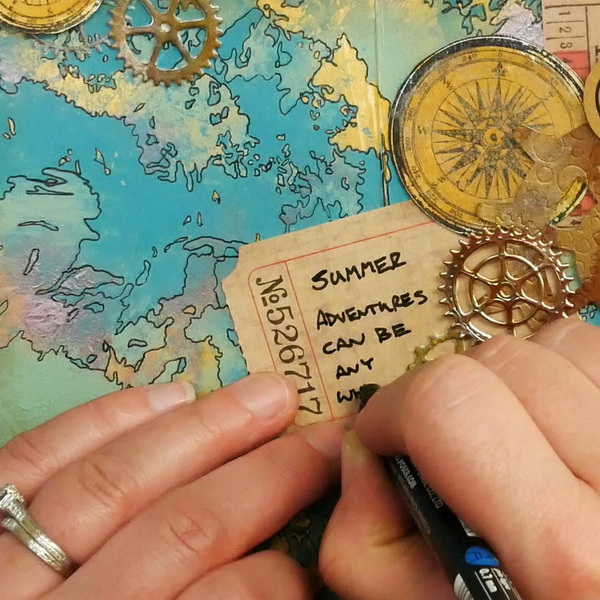
To complete this page, add in your journaling. I’ve been thinking about summer adventures, and I added this phrase: “Summer adventures can be anywhere!”
I’ve stayed in the city this summer and have been enjoying lots of little adventures. I wasn’t in the mental space to plan a trip away this summer. Plus, in Alberta the summers are short, but the weather is fantastic. I’ve been mountain biking in Fish Creek Provincial Park that borders on my neighborhood. I’ve taken so many pictures and seen so many beautiful things. I love to travel, but I have been enjoying the experience of visiting places in my own city. There’s been many wonderful adventures this summer and this is a page that will always remind me of this fabulous summer!
Any Questions?
Any questions about this technique or how to finish off these pages? I wanted to show you several different ways to finish off these pages so that you can understand how you can make them your own just through color choice or choice of finishing elements. We can play with one technique on many pages and sometimes this is where the creative inspiration happens. You never know what you might create!
Project Supply List

Tim Holtz Distress® Flip Top Paint Candied Apple, 1oz
from: Ranger Ink Industries
Pebeo High Viscosity Acrylics – Gold, 250 ml, Tube
from: Blick Art Materials
Pebeo High Viscosity Acrylics – Azo Pink, 250 ml, Tube
from: Blick Art Materials

Pebeo High Viscosity Acrylics – Cadmium Orange Hue, 100 ml tube
from: Blick Art Materials

Winsor & Newton Galeria Flow Acrylics – Pale Olive, 60 ml tube
from: Blick Art Materials

Golden Heavy Body Artist Acrylics – Cobalt Teal, 5 oz
from: Blick Art Materials

Liquitex Heavy Body Artist Acrylics – Phthalo Green (Blue Shade), 4.65 oz Tube
from: Blick Art Materials

Tombow Mono Twin Permanent Marker – Black, Bold Tip
from: Blick Art Materials

Water Brush Pens for Watercolor Painting: Blend, glaze and paint with your favorite watercolors as well as with water-soluble colored pencils and markers without the need for a water cup.

Sizzix – Tim Holtz – Alterations Collection – Thinlits Dies – Gearhead
from: Scrapbook.com
Idea-ology – Tim Holtz – Ticket Book
from: Scrapbook.com
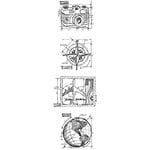
Stampers Anonymous – Tim Holtz – Cling Mounted Rubber Stamp Set – Mini Blueprint Strip – Travel
from: Scrapbook.com
Ranger Ink – Tim Holtz – Distress Spray Stain – Stormy Sky
from: Scrapbook.com
Ranger Ink – Tim Holtz – Distress Spray Stain – Tarnished Brass
from: Scrapbook.com
Ranger Ink – Tim Holtz – Distress Spray Stain – Cracked Pistachio
from: Scrapbook.com
Ranger Ink – Tim Holtz – Distress Spray Stain – Brushed Pewter
from: Scrapbook.com
Ranger Ink – Tim Holtz – Distress Spray Stain – Vintage Photo
from: Scrapbook.com

Ranger Ink – Tim Holtz – Distress Spray Stain – Antiqued Bronze
from: Scrapbook.com

Idea-ology – Tim Holtz – Salvaged Tags and Ticket Book Bundle
from: Scrapbook.com
Designed to appeal to students, Canson XL pads contain more sheets at a comparable or better price than other value pads in the marketplace.
PaperArtsy Fresco Finish Paint – Calypso [FF162] – Opaque
from: Joggles.com, Inc
PaperArtsy Fresco Finish Paint – Lemon Meringue [FF142] – Opaque
from: Joggles.com, Inc

A 5-piece premium quality stainless steel artist palette knife set with sturdy comfort-grip wooden handles. Set includes the essential shapes and sizes needed for most types of palette knife techniques and painting applications.

Pitt Artist Pens offer a waterproof pigmented India Ink with unsurpassed lightfastness. These acid-free pH neutral markers come in a wide variety of colors and nib sizes and provide great versatility to pen-and-ink drawings requiring lots of intricate details.

Every facet of fine-line detailing and permanence has been incorporated into the Microperm Pen by Sakura. For writing in micro-spaces or on unusual and challenging surfaces, the Microperm meets the challenge.

Introducing the ultimate tool for unleashing your creative potential - the Posca Paint Marker. Elevate your artistic endeavors with a marker that combines innovation, versatility, and top-notch quality, all in one package.
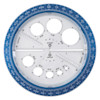
Helix Angle and Circle Maker – $5.59
from: Blick Art Materials

- Ideal for drawing students - artists and designers
- Superior leads made of finely ground graphite and clay
- Pure - premium quality pencils are smooth - never scratchy
- Ideal for sketching, drawing and writing
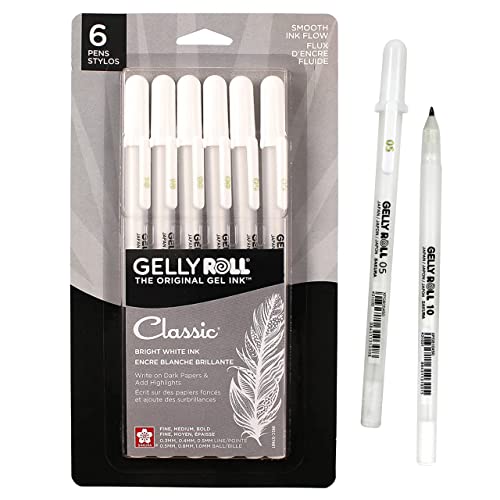
Bright, Opaque White Ink: Sakura Gelly Roll pens have vibrant white ink that flows creamy smooth onto paper.
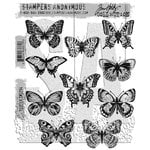
Stampers Anonymous – Tim Holtz – Cling Mounted Rubber Stamp Set – Flutter
from: Scrapbook.com

Hammermill 8.5” x 11” Colored Cardstock 110lb Paper is a premium thick cardstock designed for print and copy use on copiers and printers. It’s heavy cardstock that’s ideal for heavy duty projects.

Ranger Ink – Archival Ink Pad – Jet Black
from: Scrapbook.com

Art Glitter Glue is permanent and dries clear and adheres to a variety of surfaces. It's water based and acid free. Make sure to close lid to avoid drying of glitter glue. Bundle comes with one bottle of 8oz, one bottle of 2 oz and a metal tip for easy application.

You're going to feel just like an expert when you're cutting the smallest of details with the Cutter Bee Scissors by EK Success. These un"bee"lievable compact scissors will have you feeling like a queen bee when you swarm right into your fine detail or fussy cutting projects.